
* Please note, I very much dislike when I’m looking at a prop tutorial that says its a “build X from things laying around your house” and half way through it the builder says something like “…once that’s dry, glue *random or expensive item that no normal person has in their home* to the prop” or “Now that the sanding is done , we will need get on your lathe.” . I’ve done my best to minimize that occurrence in this build. If there is something like that in this post for you, I apologize sincerely, as it is my intention to make this tutorial with very common everyday items.*
Are you ready to put this bad boy together? Me too.
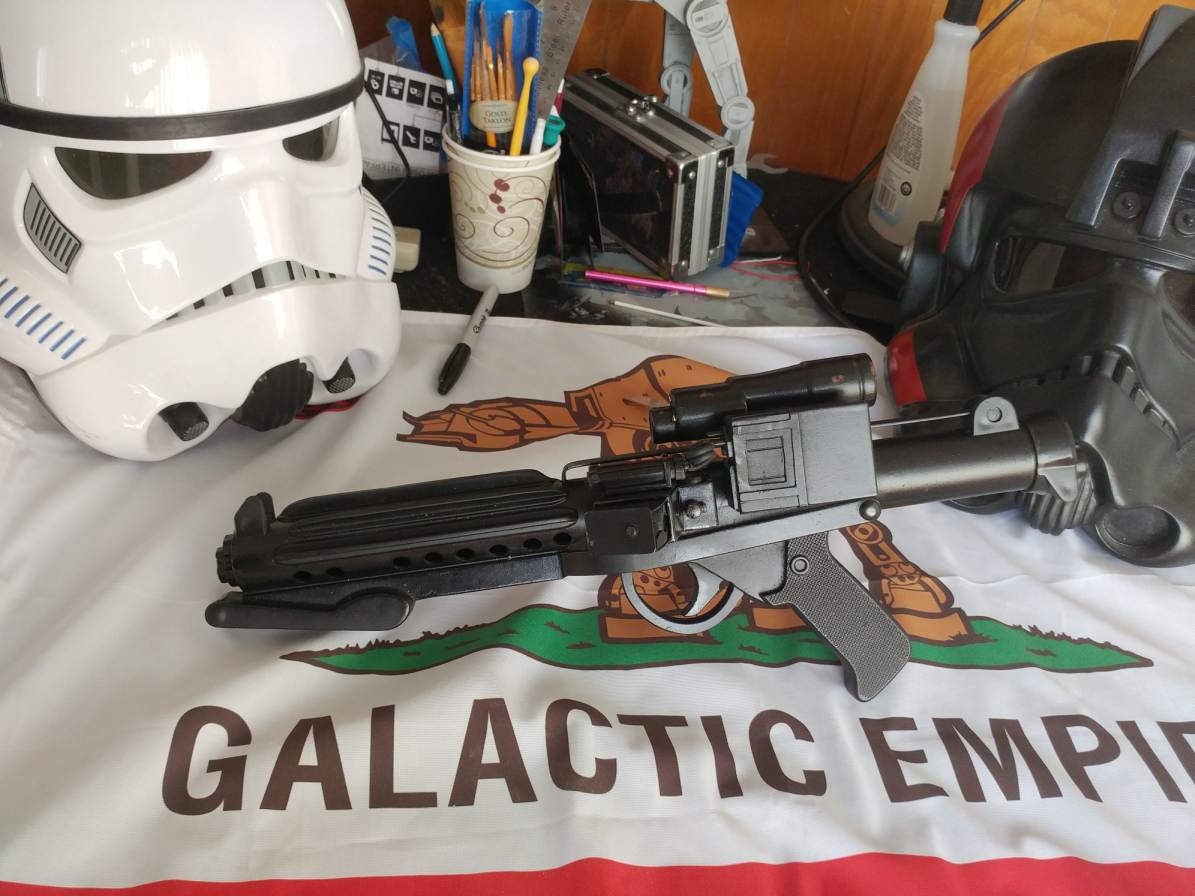
For the last post, we are going to finally start adding things to the blaster, clean up some more seams, fill some holes, learn how to use Bondo (or other body filler), realize I am not good with Bondo, try to fix Bondo mistake with over sanding, and finally giving up at painting the sucker.
What you need for this final part:
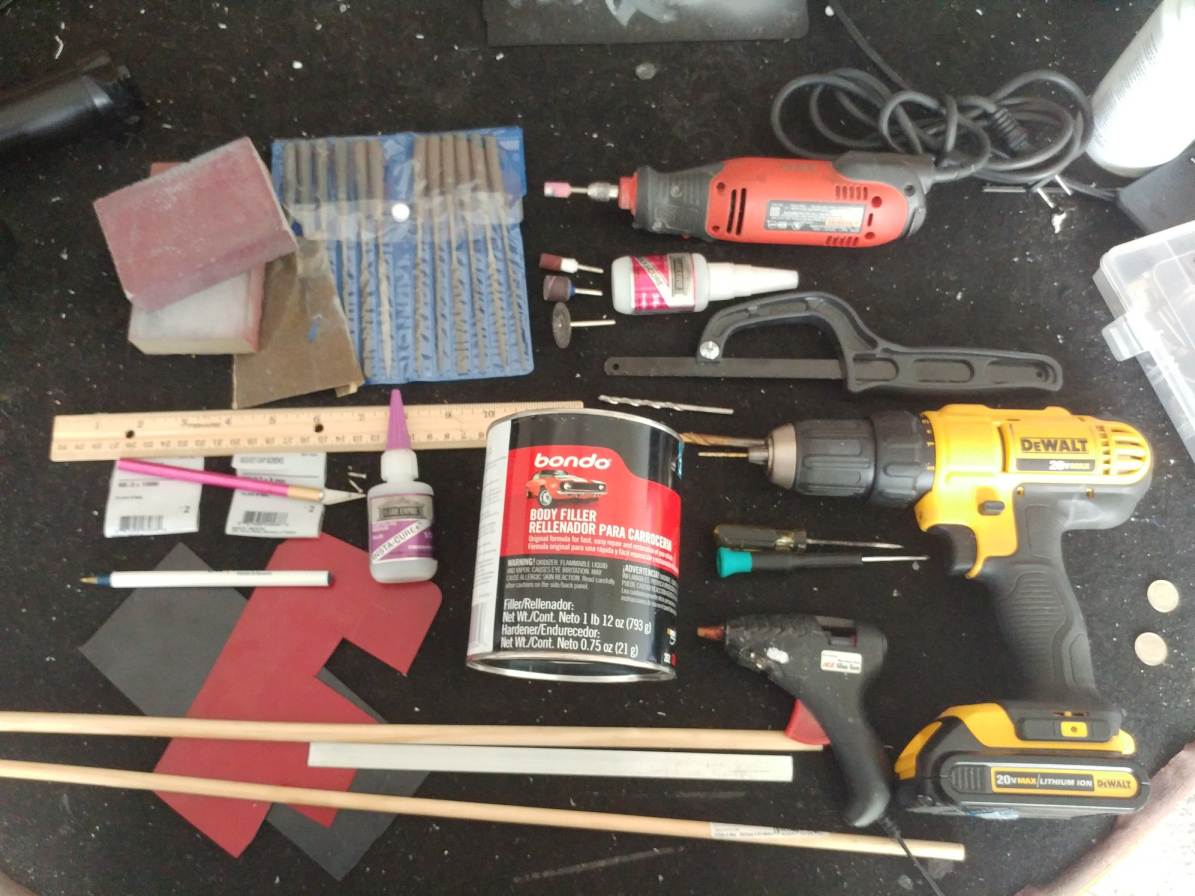
The pieces of the blaster you have piled in front of you.
- Sand Paper!
- Rotary Tool/Dremel
- HackSaw/Hobby Saw
- X-acto/Hobby Knife
- Ruler
- Drill – various bits
- Bondo or similar body filler
- Scrap plastic/card stock
- Wooden Dowels (the below measurements are what they commonly come as at my local craft store, why one is labeled in inches and the other is centimeters is beyond me)
– .3125inch x 36in
– .79375cm x 91.44cm - 3/4in x 2m metal bar (same one from the last post)
- x2 .7x8mm Socket Cap screws (these get screwed to the front of the gun)
- x2 .8x10mm Socket Cap Screws (to mount the scope to the scope rail)
- Coiled Cord (like the can that car chargers used to use)
- A ball point pen (needs to have an end cap w/out a hole in it)
- GLUE – Hot, Super, etc
Also Paint, same paint I said you would need yesterday, but we didn’t get to it….
Step One: Barrel of Monkeys
Bad pun aside (get used to it), this is something your really don’t need to do. It’s just one of those little details help bring things together.
Take that 1/2inch wooden dowel and cut it to fit in the front half of the gun. It should fit snugly again the front of the gun and the mag well.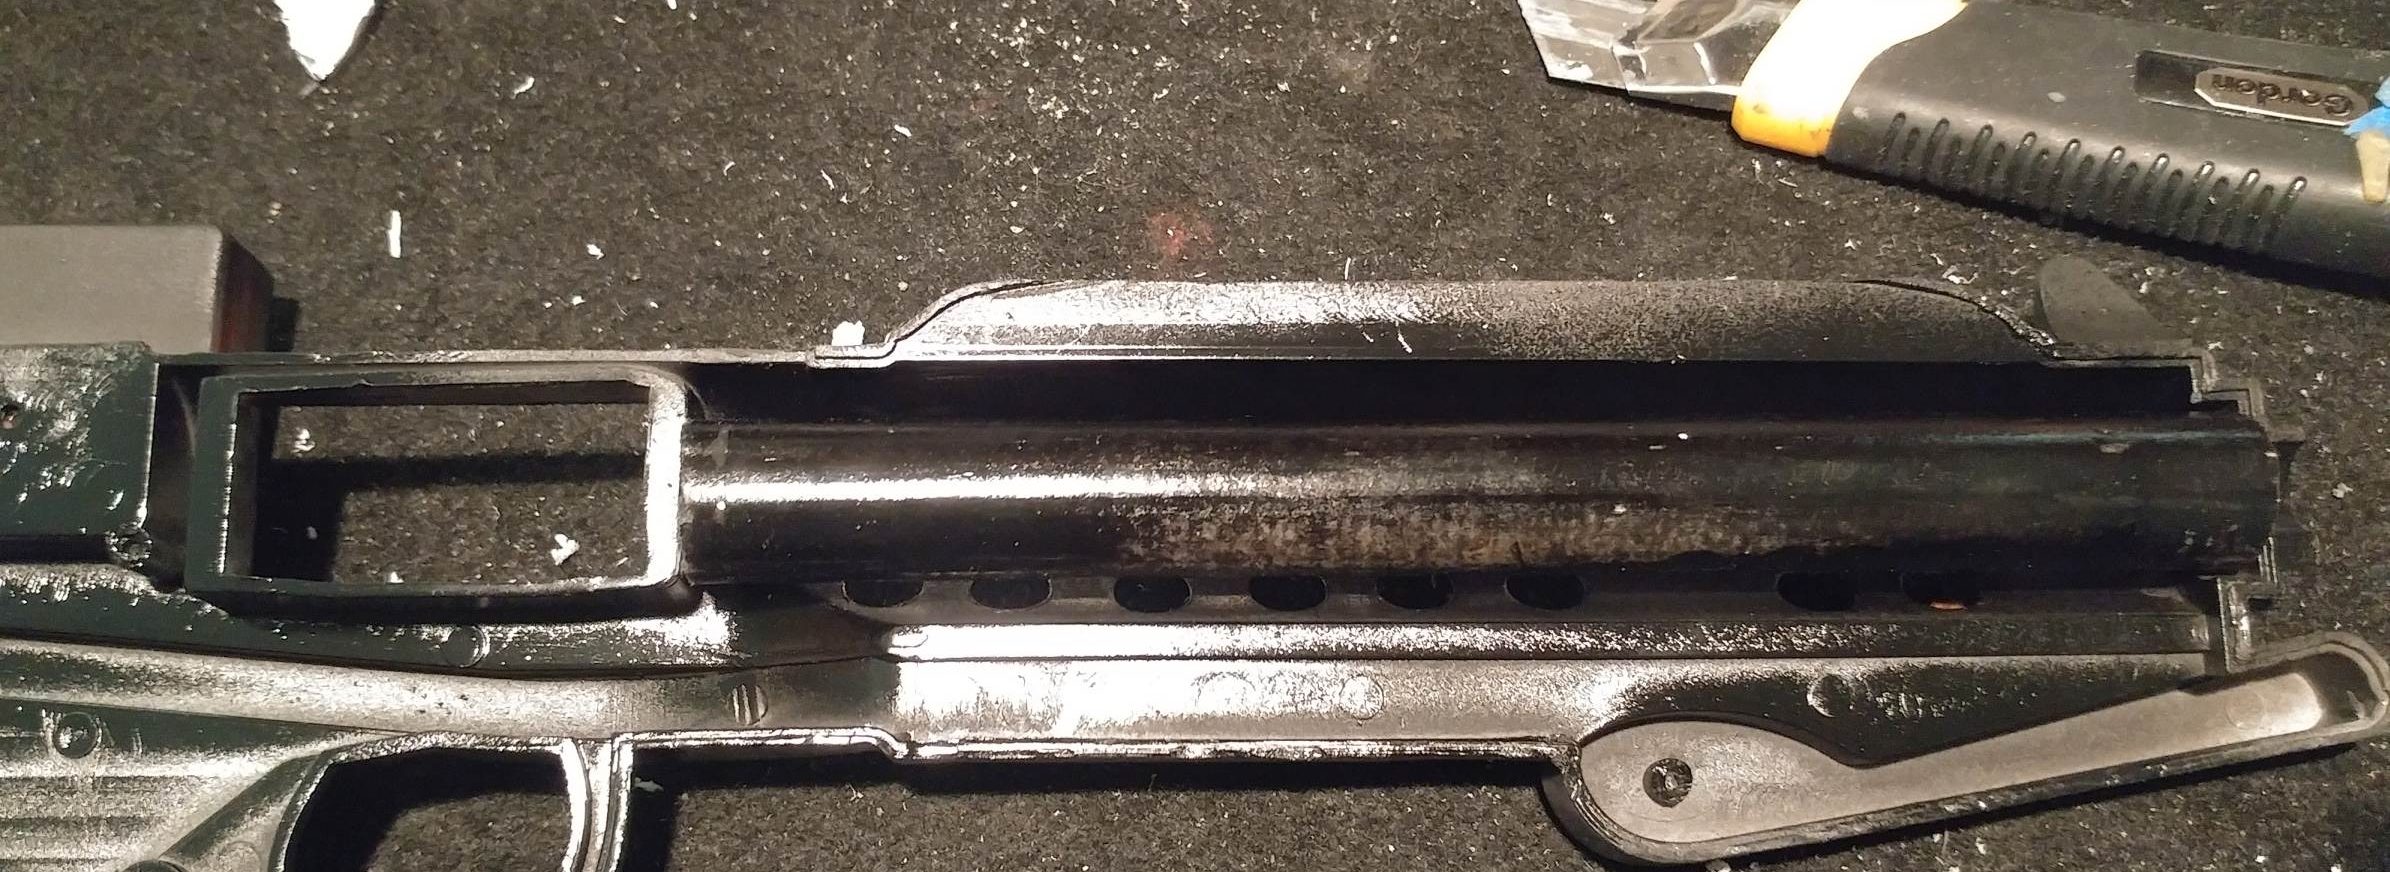
Before gluing it in place, you’ll want to paint it. Use a what ever black you have on hand.
Step Two: Alderaan Was An Inside Job
Before we get too crazy with the…crazy…glue… we need to do a couple things on the inside of the blaster.
- Plug the screw holes and add the bolt spring.
Take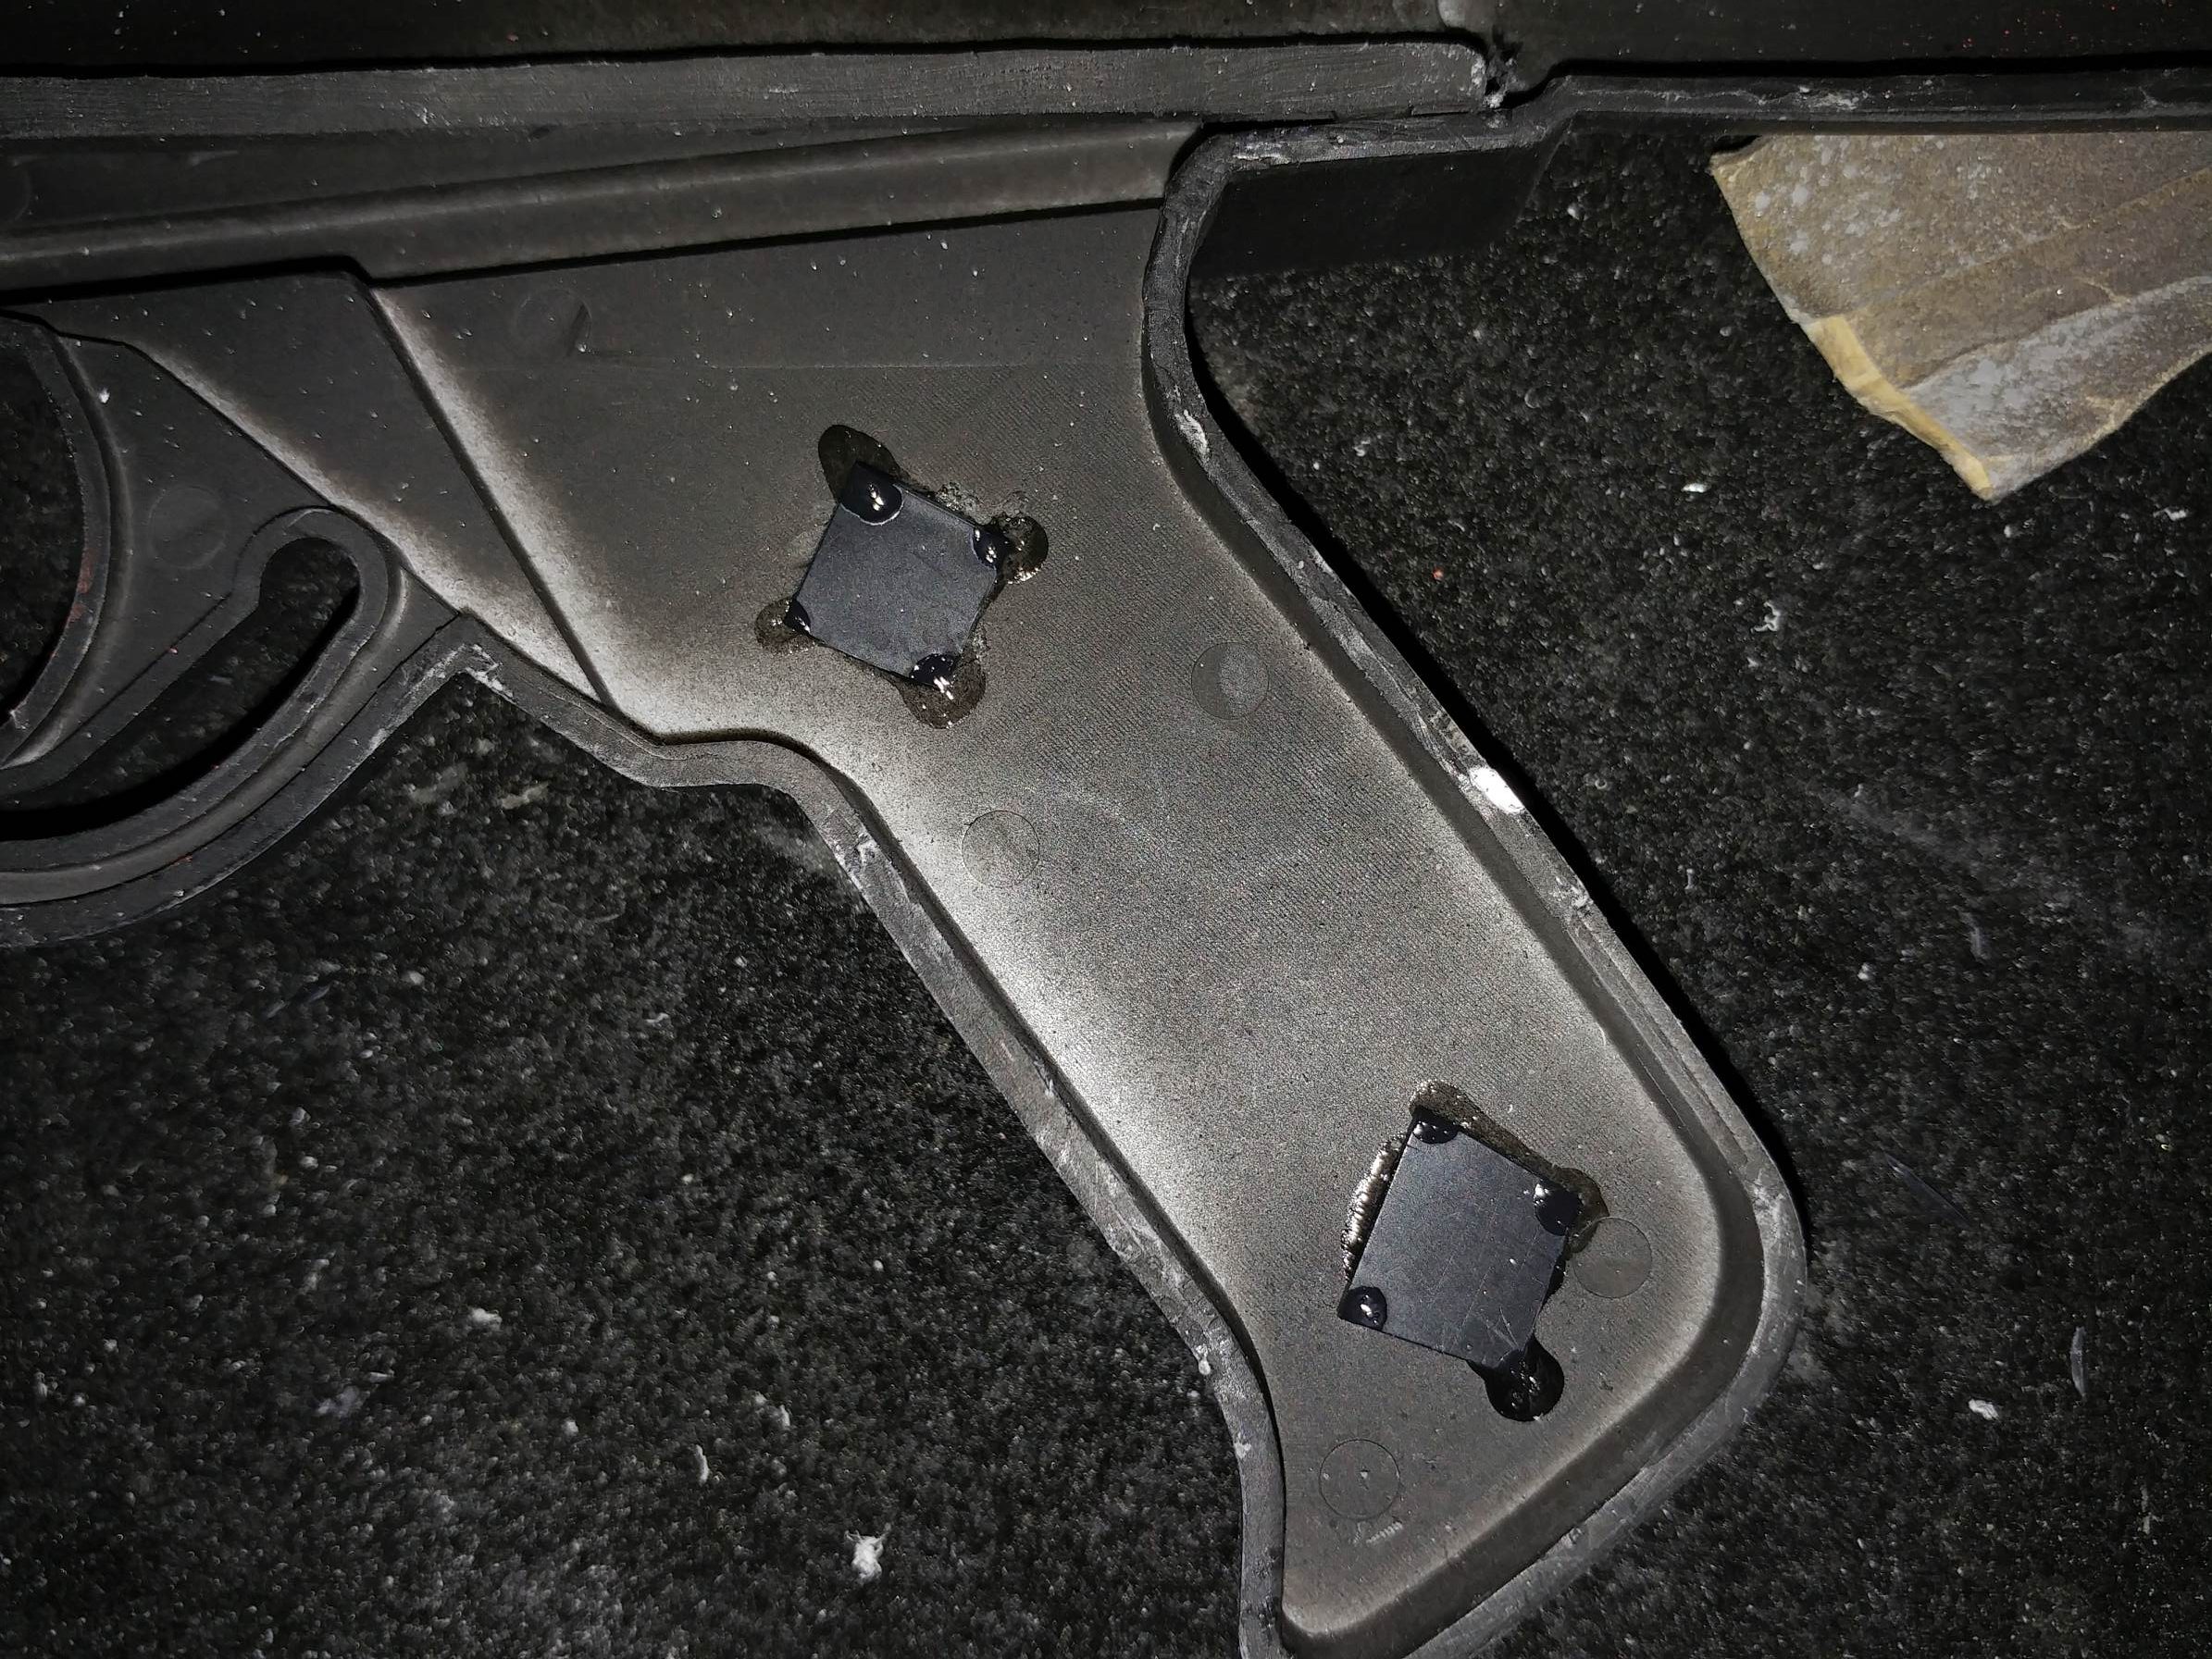 some scrap plastic or something and cut small squared out. These squares (or any other shape, you choose) just need to be big enough to cover the screw holes on the inside. We want the Bondo to have a stable foundation when we hide these holes on the outside later. While you have the plastic out, trace the bottom of the pipe you used for the “bolt” (assuming you didn’t toss it out), cut out the circle and glue it to the back end of the faux bolt. Test fit the two blaster halves together, trimming the circle as needed. This circle will be used as a base for the spring we are going to make next.
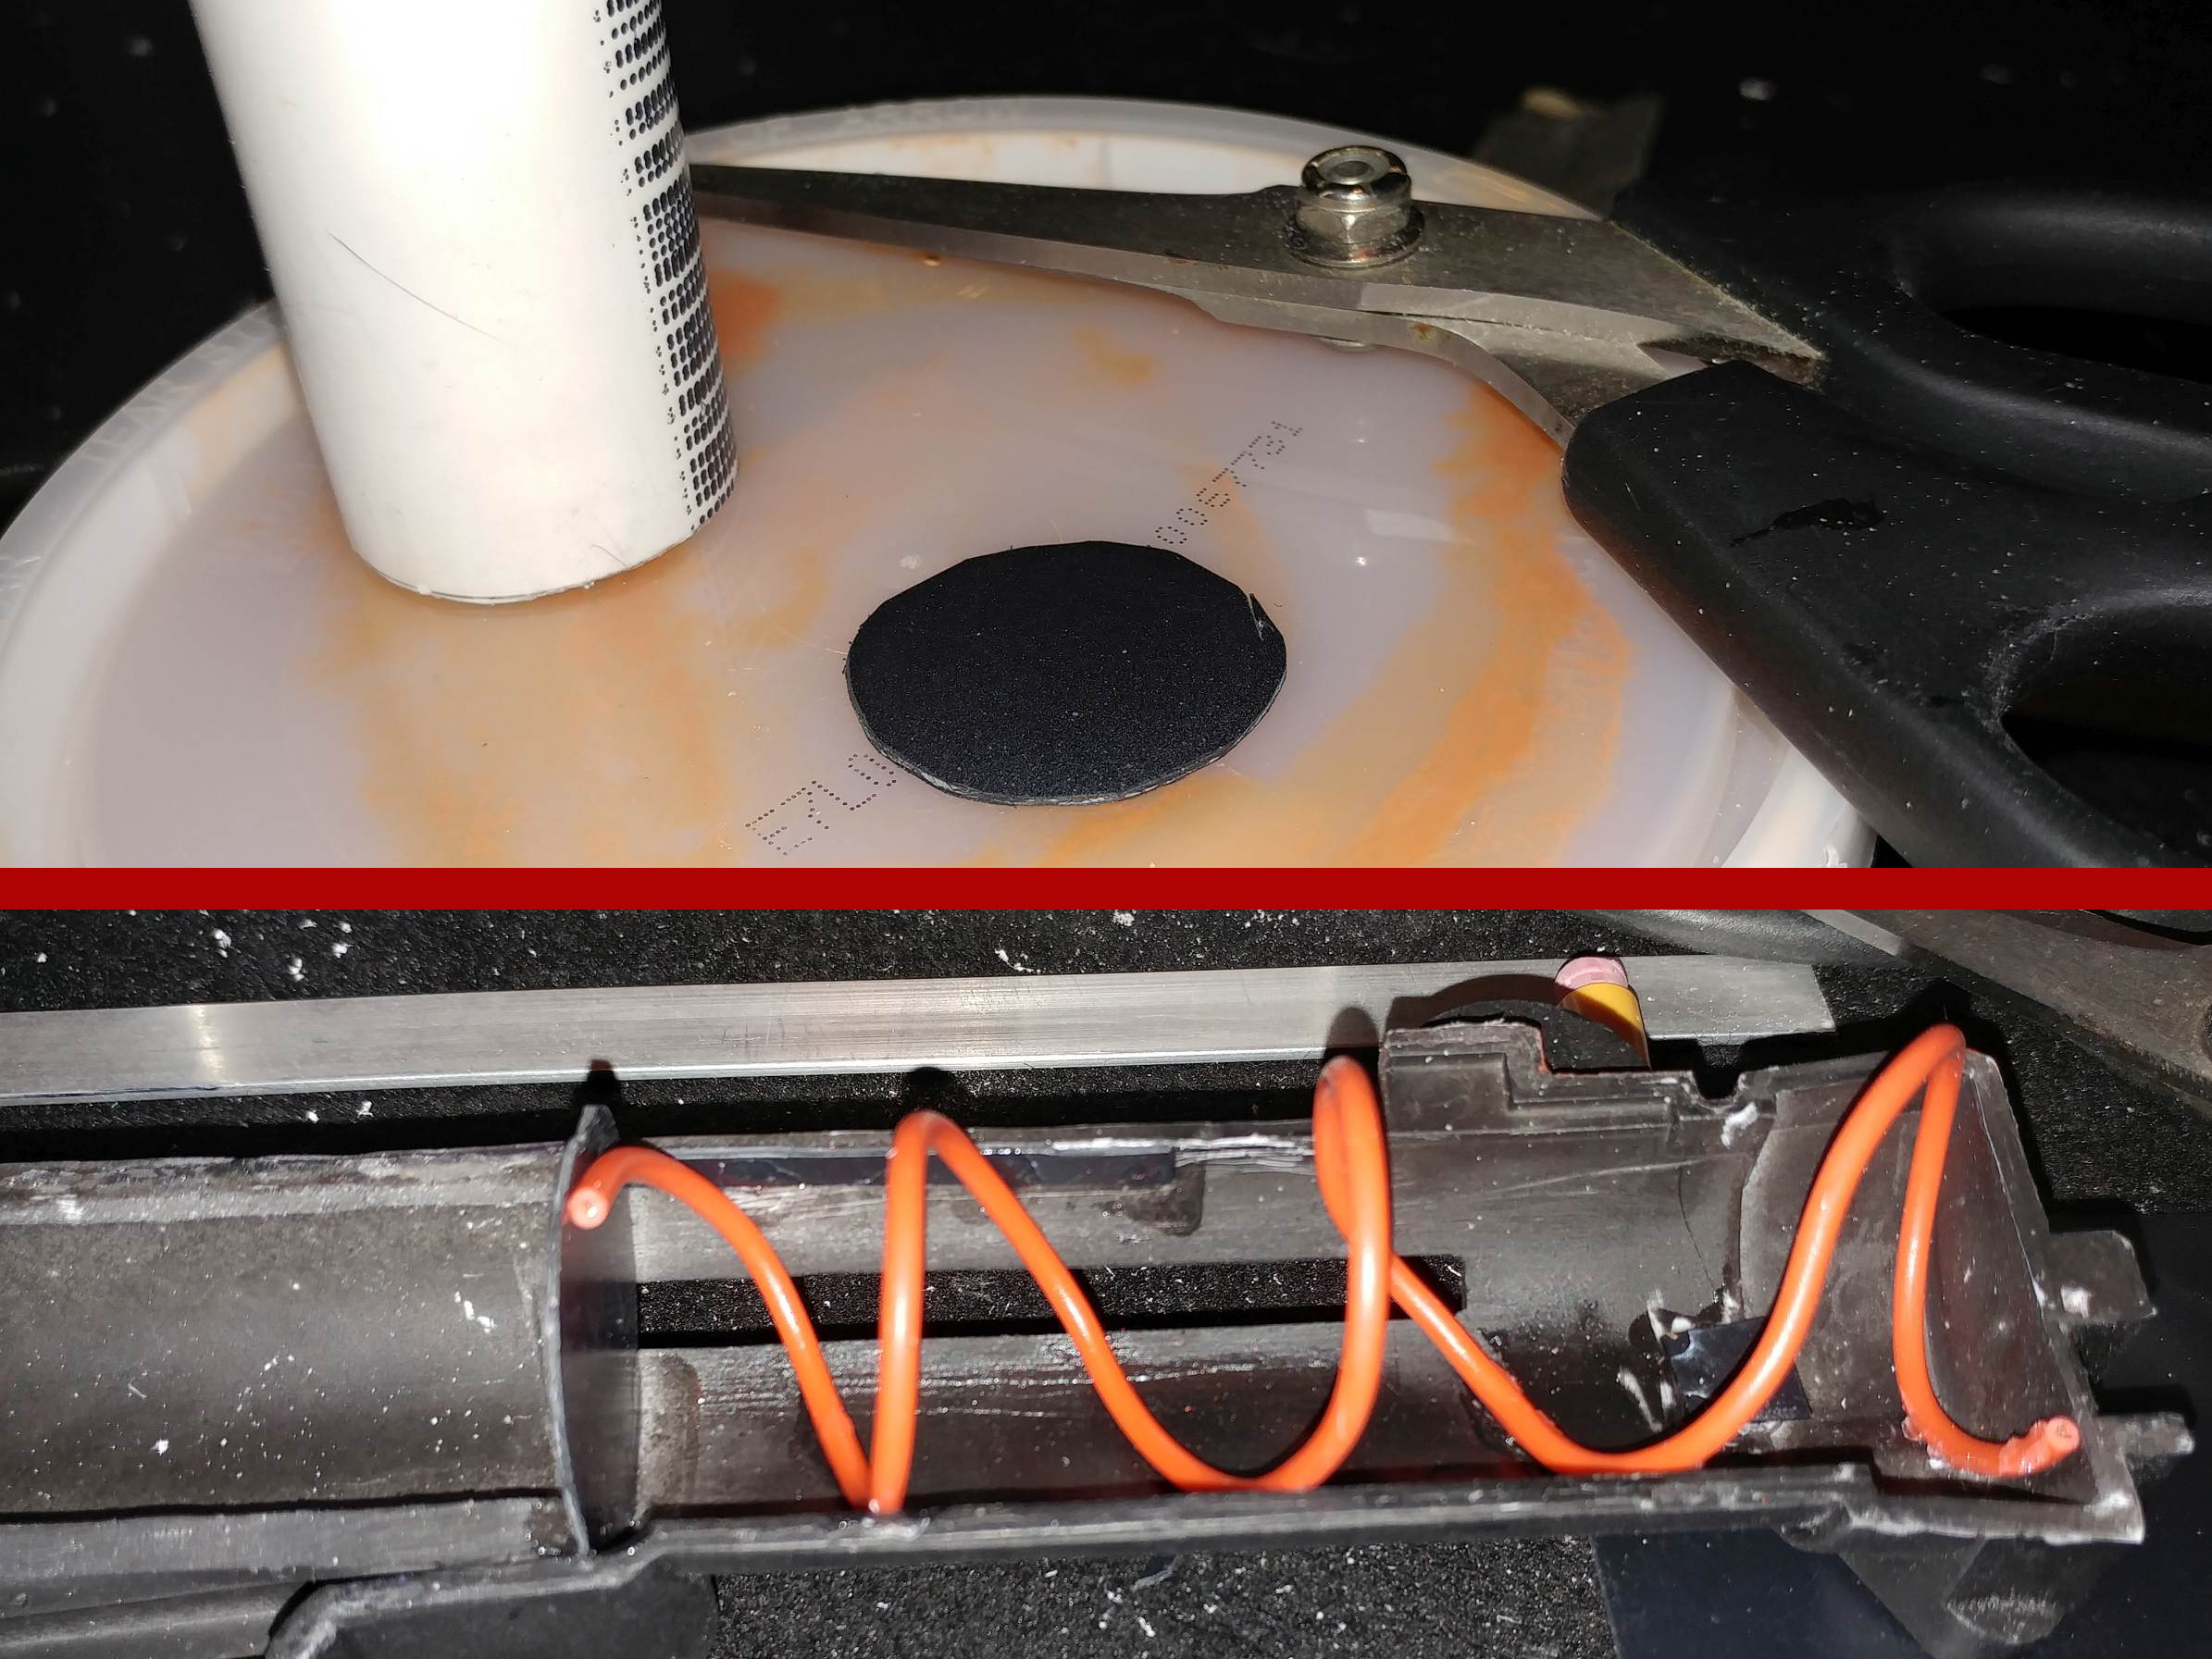

Remember that wire I said to get yesterday? Now we are going to use it. Start tightly coiling the the wire
around any tube like object that would fit inside the shell if it were closed (I used a ‘C’ size battery). Place the coiled wire inside the shell on the half with the ejection port. Add a drop of super glue where the coils touch the walls and the bolt end cover you made.
This is also a good time to give the ‘spring’ a quick brush of black paint. We will add silver paint later, but this will be your last chance to hide the wire’s coloring (if you used red like me. Use black. Rookie mistake on my part),
Alternatively, if you have a spring that will fit. Use it. That would be cool. I just have a lot of this wire laying around.
Step Three: Use The Force
*I didn’t feel it was necessary to photo document this part, it’s gluing things. You Got This. I Believe In You.*
The Force, the thing that binds the universe together like glue. It’s glue time is what I’m alluding to here.. no one gets me.
It’s time, my young Padawan. Time to put this thing back together.
First test fit it together, you may have some rough spots from Operation “Breaking it in Half”. Cut or sand anything that causes fitment issues.
For the actual gluing, I like to use an Extra Thick model glue. It’s commonly available at most hobby stores/Tabletop Gaming stores. It takes a bit longer to dry, so it gives you the time to line everything up.

*the company that makes this glue isn’t whats on the label, the manufacturer adds labels of the store that sells them. I have ones from my local shops; Game Empire, At Ease Games, Pair-a-Dice, and so on
Once everything is realigned, hold it tightly for a few minutes for the glue to dry. I like to place two clamps on the opposite ends of the blaster. You could probably get away with tightly wrapping tape. You want to put a lot of pressure on these two halves to minimize any gaps from the shells pulling away from each other.
When it is dry, go over the seams with a hobby knife and sand paper to get those seams even more even. If you still have some nasty seams, at this point you can due major surgery (deep cuts) to fix these. We will use a body filler /Bondo later to fill and even out the majority of deep gaps.
Step Four: Mind the Gaps.
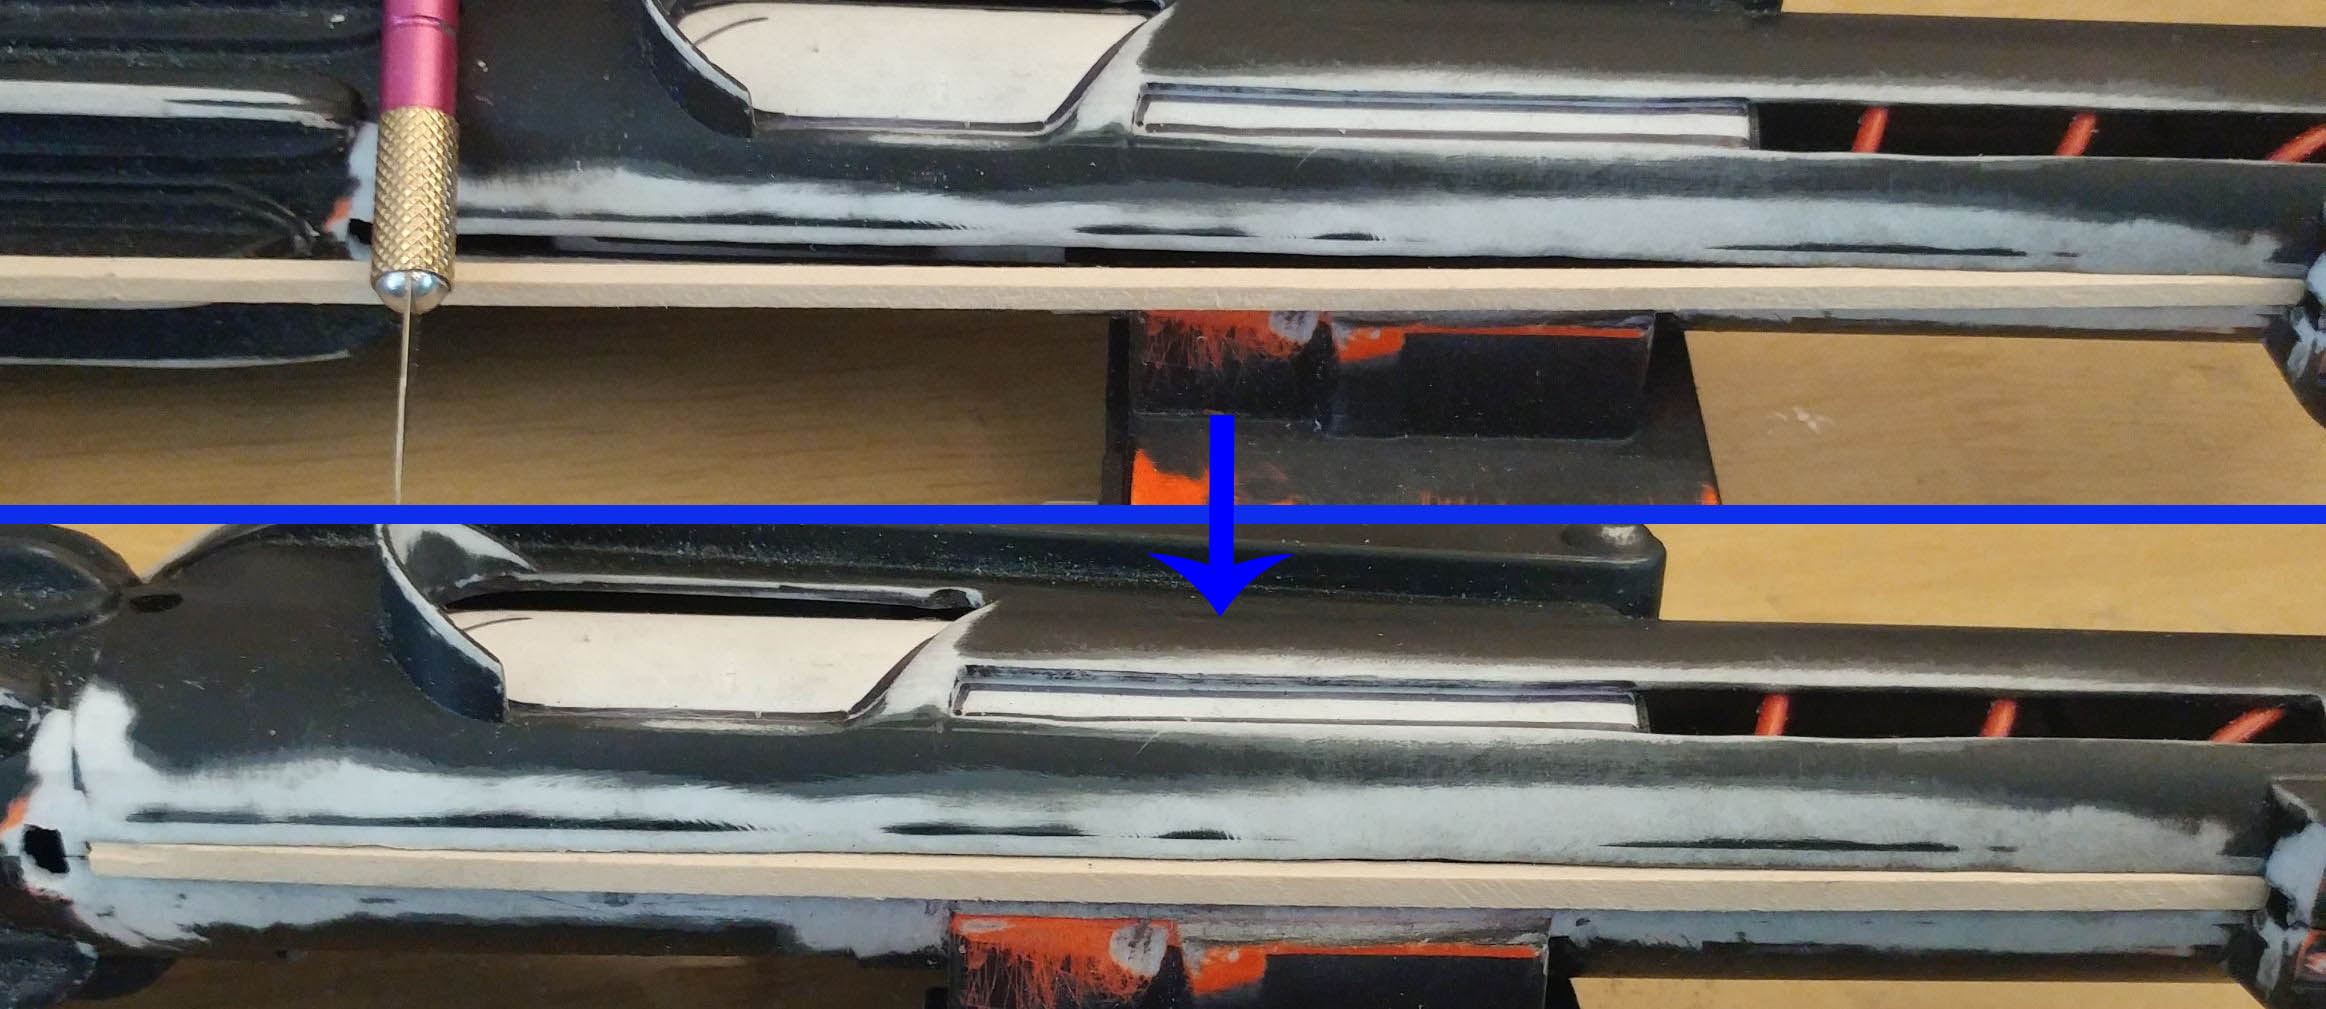
You may have become aware of a large hole running along the top of the blaster. We need to fix this. “But how?”, you ask. Pay attention, I’m here to help.
I had some scrap wood sticks lying around that fit perfectly. You could get away with using a long strip of cardboard fitted to to the slot. Try to make it as flush with the plastic as possible. Even a little below the lip would be fine.
Now you need to fill the screw holes. Take your glue gun and fill the holes. Don’t fill them all the way, like the hole on top, we want there to be a small lip surrounding the hole. Something for the Bondo to fill in.
We are going to finish filling these holes later, promise.
Step Five: It’s the Little Things
In this step we are going to create those unnoticeable little details that really make the prop come alive.
We are going to start at the ammo counter, go to the mag well and then go back to the ammo counter! What a ride, yeah?
All we need for this part is a ballpoint pen, one of the screws we removed from the body and some 1mm thick plastic.
Ammo Counter:
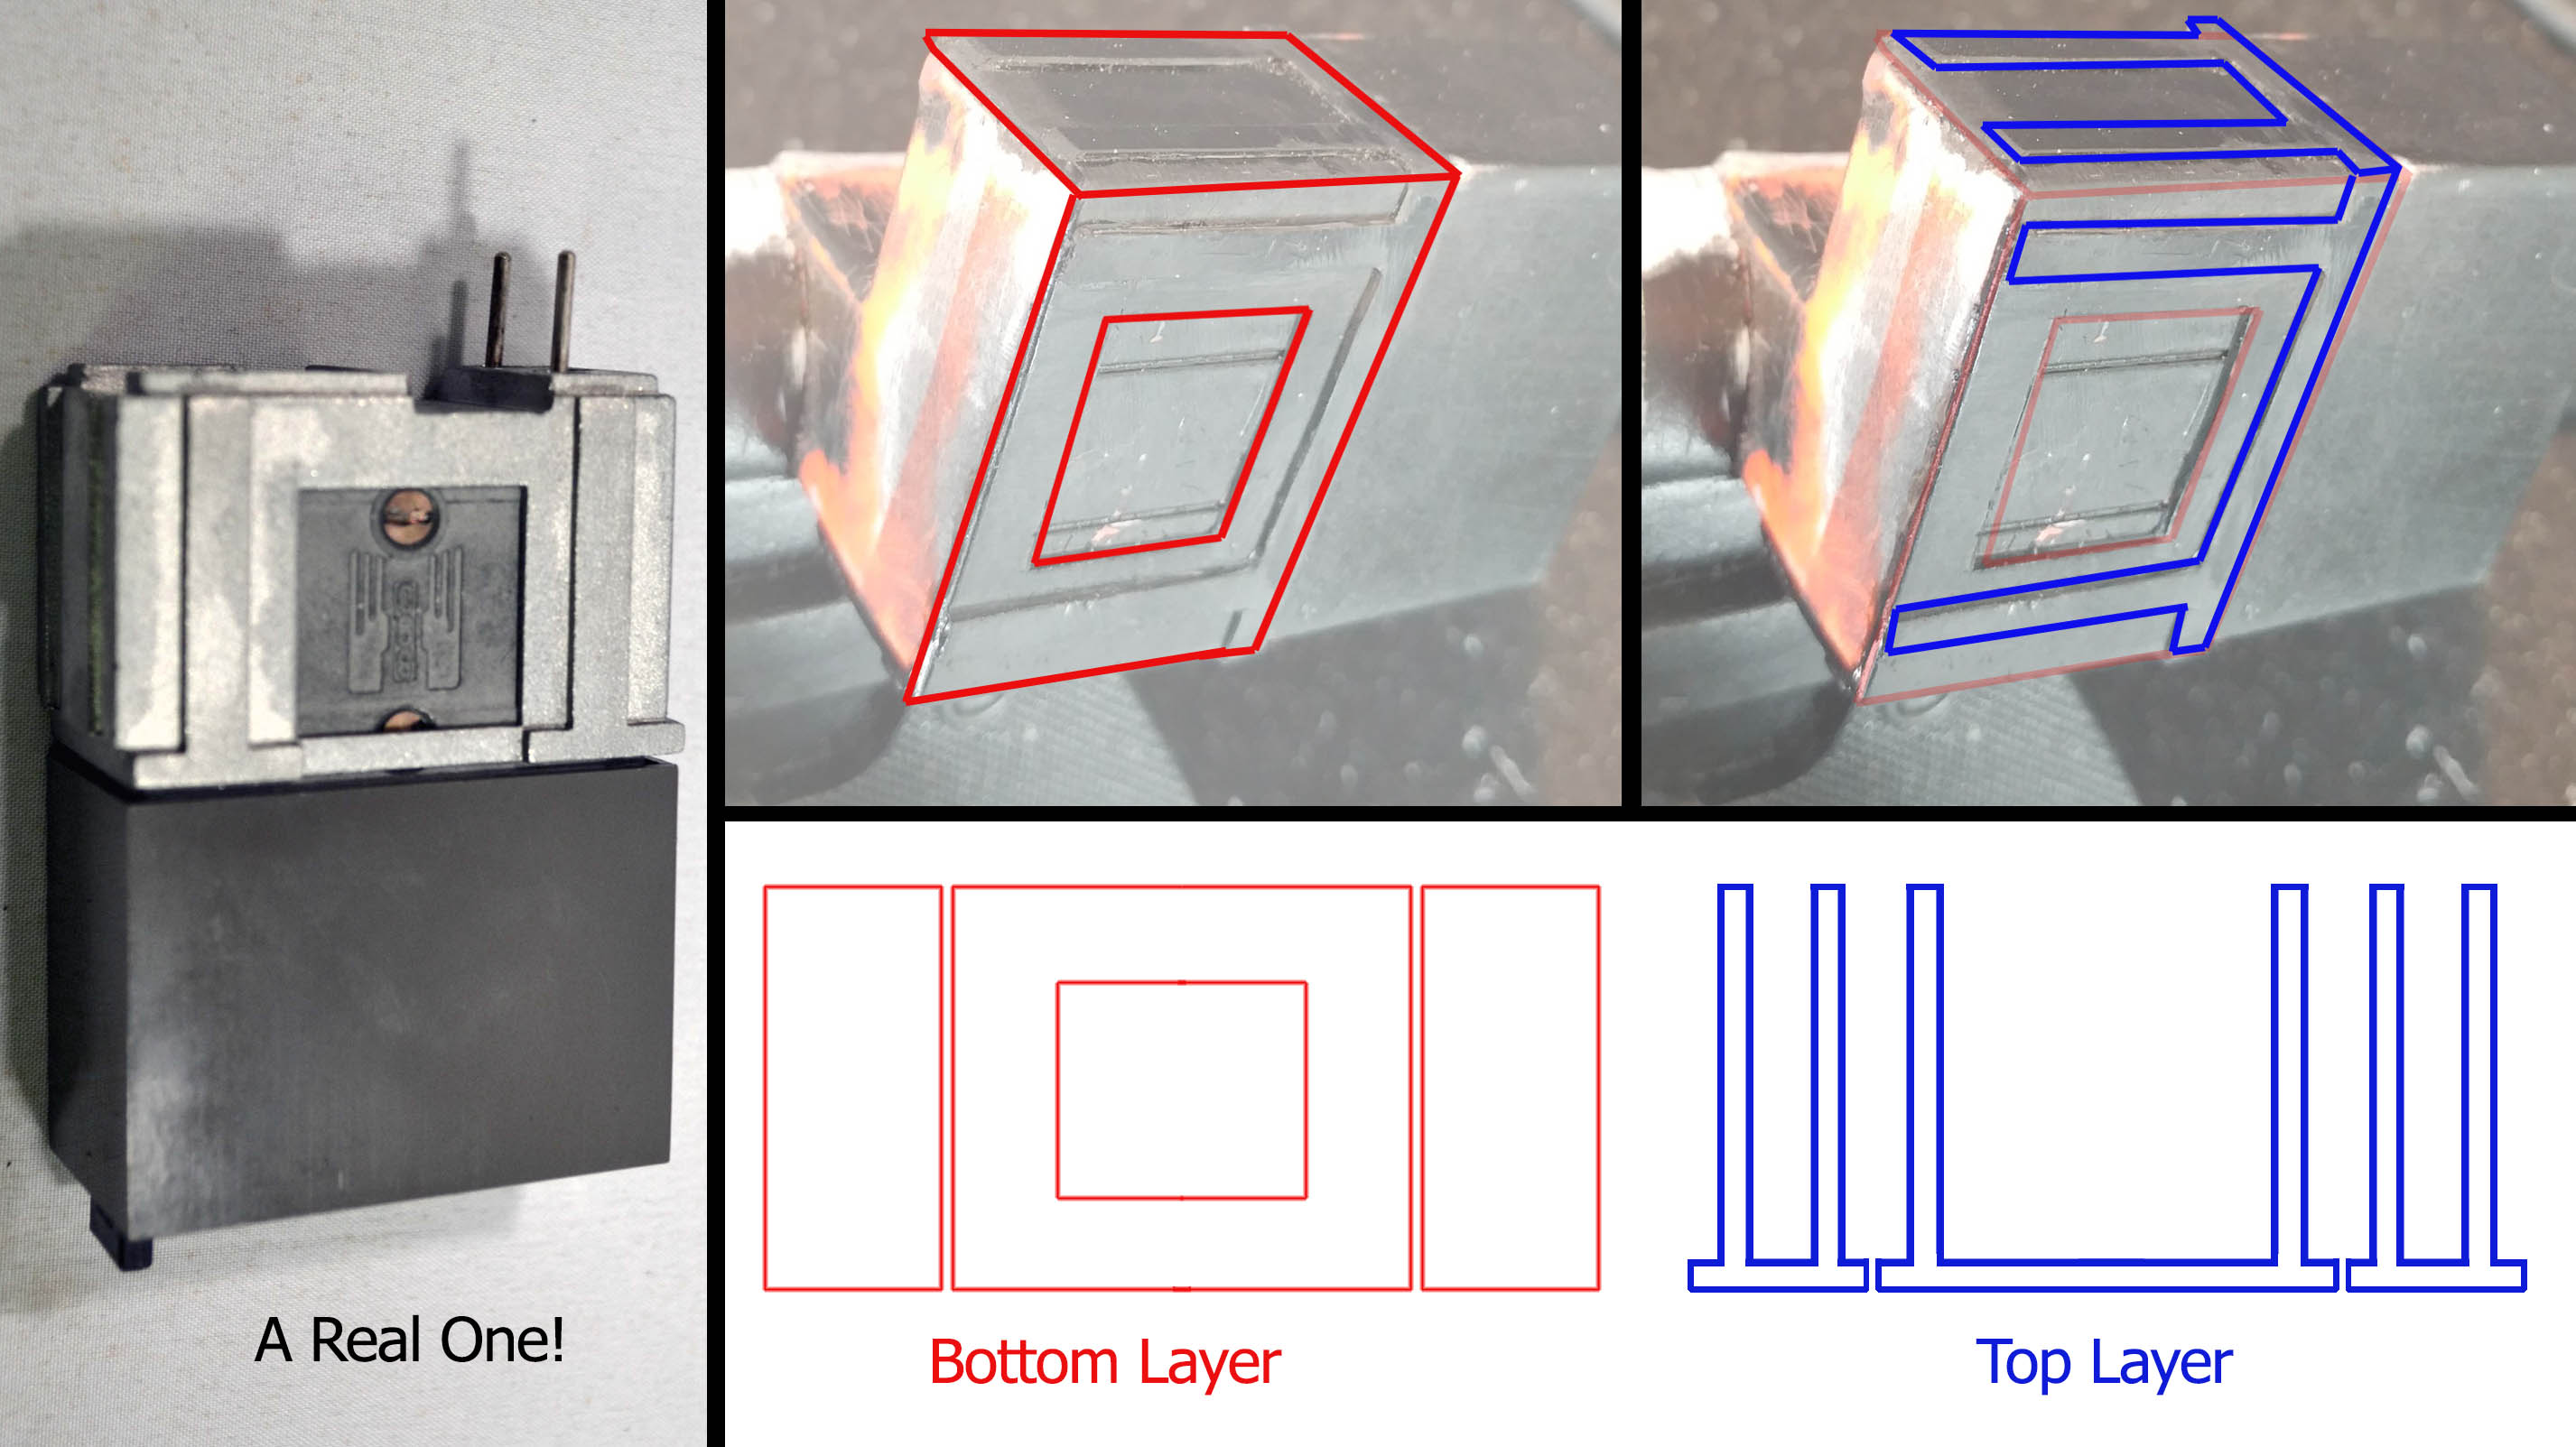
As you can see from the pictures above, we need to add a bit of plastic to make this thing a little more accurate. On the toy, you will notice that the front half of the ammo counter is slightly smaller than the back half.
Bottom Layer:
- Cut two rectangles, roughly 22mm x 32mm, these will be the top side and bottom side pieces
- Cut one 46mm x 32 mm rectangle, this will be the large side piece with the square in it.
- Using Hobby Knife/X-Acto blade, cut a 24mm x 18 mm ‘square’ (rectangle) about 4mm from the bottom
- Test fit the pieces, trim if necessary
- Glue the pieces onto the counter.
Top Layer:
This is a series of several ‘T’ shapes. For the most part, everything in this is a 4mm wide bar. You can either:
a) Cut a couple long 4mm rectangles and cut and glue them to fit.
or
b) draw the above blue image to the measurements of your counter, again using 4mm as the width of the bars.
I’ve done both ways in the past and both have turned out all right. Sand/file down the edges so that they are slightly rounded. When done it should come out looking something like this:
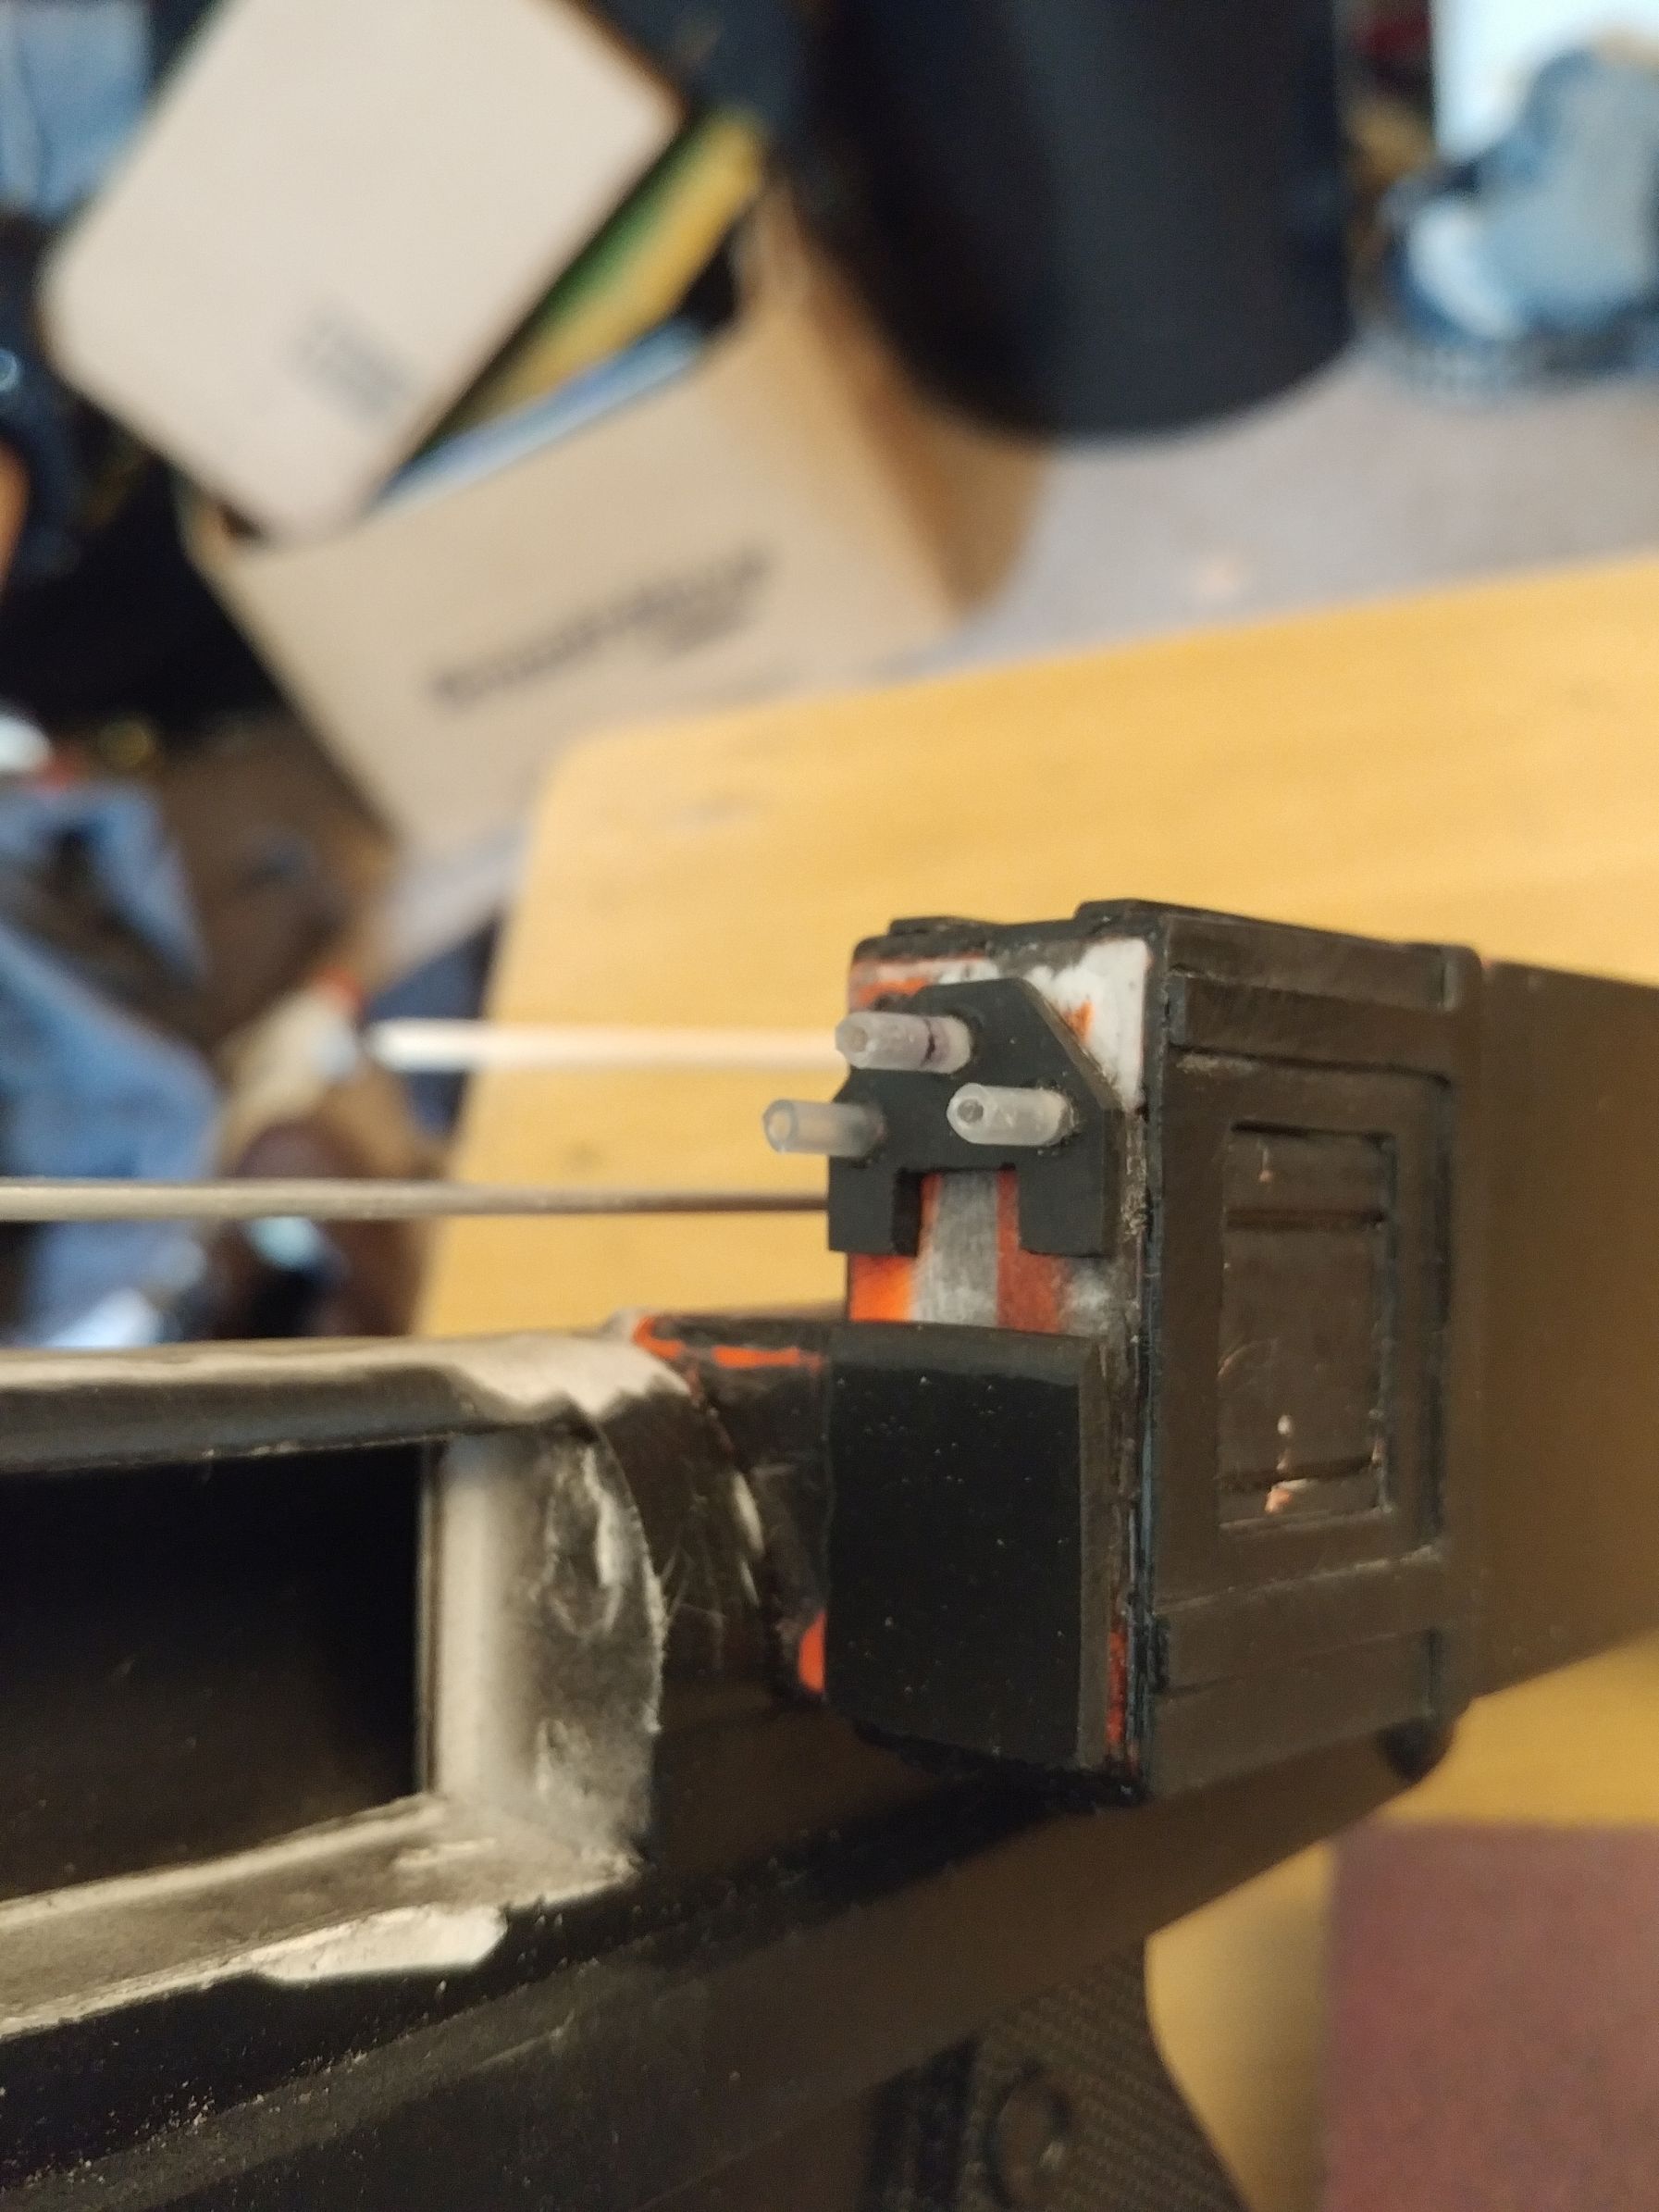
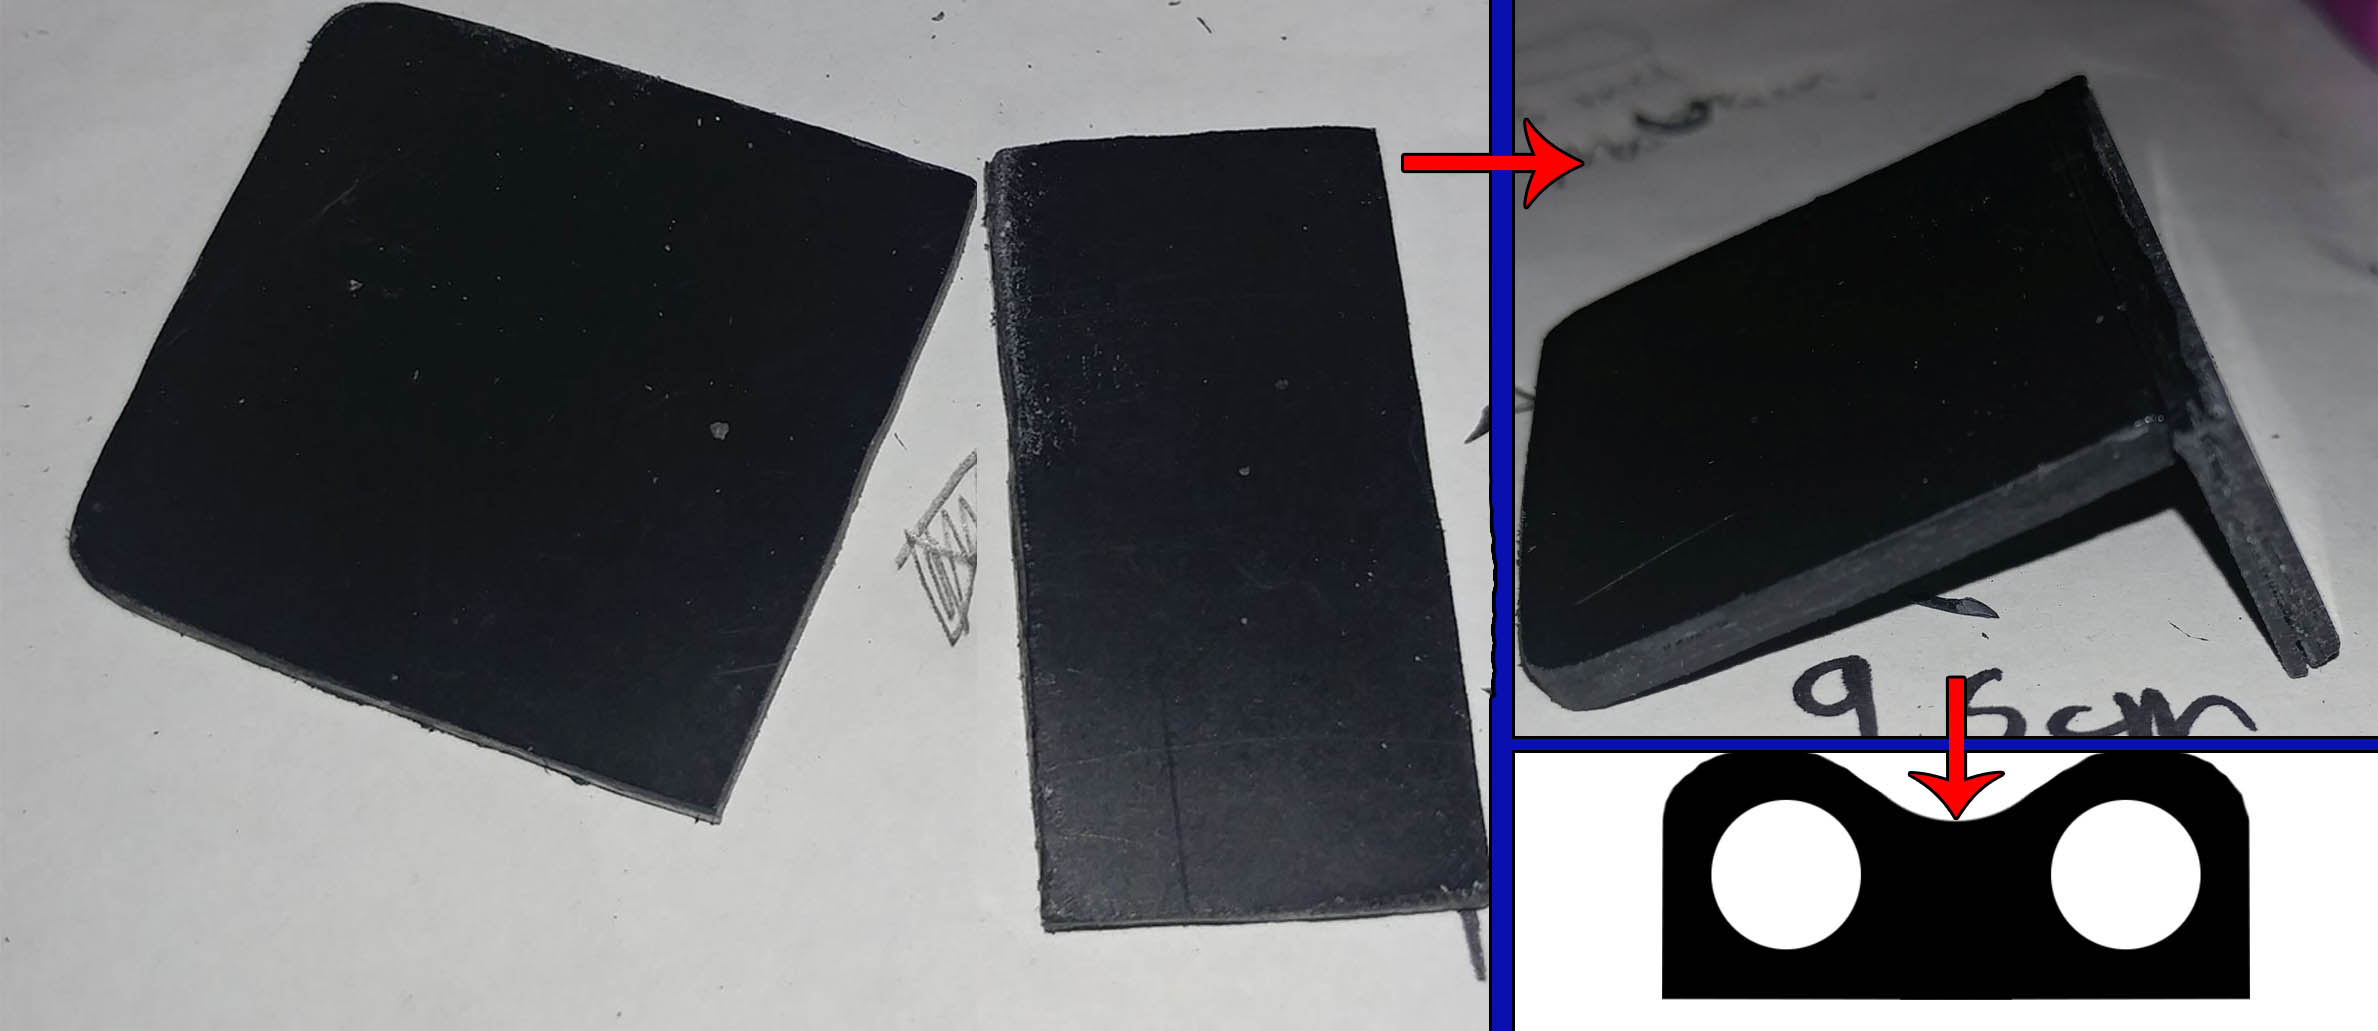
The front side of the ammo counter has two shapes we need to recreate a rectangular box (#1) and a kind of house shaped object with three rods sticking out (#2/#5).
For the rectangle:
- Cut three (3) rectangles about 2cm x 1.8cm
- Glue the three pieces together.
- Sand/File the edges even
- Grind the top edge of the rectangle to an angle (see below)
- Glue rectangle to the bottom-center of the front of the ‘ammo counter’
For the ‘other’ shape:
- Cut two 1.5cm x 1.8 cm squares
- Glue them together!
- Make two cuts 5mm from the lower edges 5mm up,
- Make another cut connecting them. Remove the rectangle you just cut out.
- Make a pencil mark 5mm in from both sides on the top side
- Make two more marks on the edges 8mm up from the bottom.
- Draw angled lines connected the two dots. Cut and remove the corners.
- Drill three holes (see picture below)
- Cut three 4mm lengths of “ink tube” (I know not what this is actually called)
- Glue ‘The Shape’ to the upper center of the front of the ammo counter.
- Put some glue n the three holes and insert the pen tubes you cut
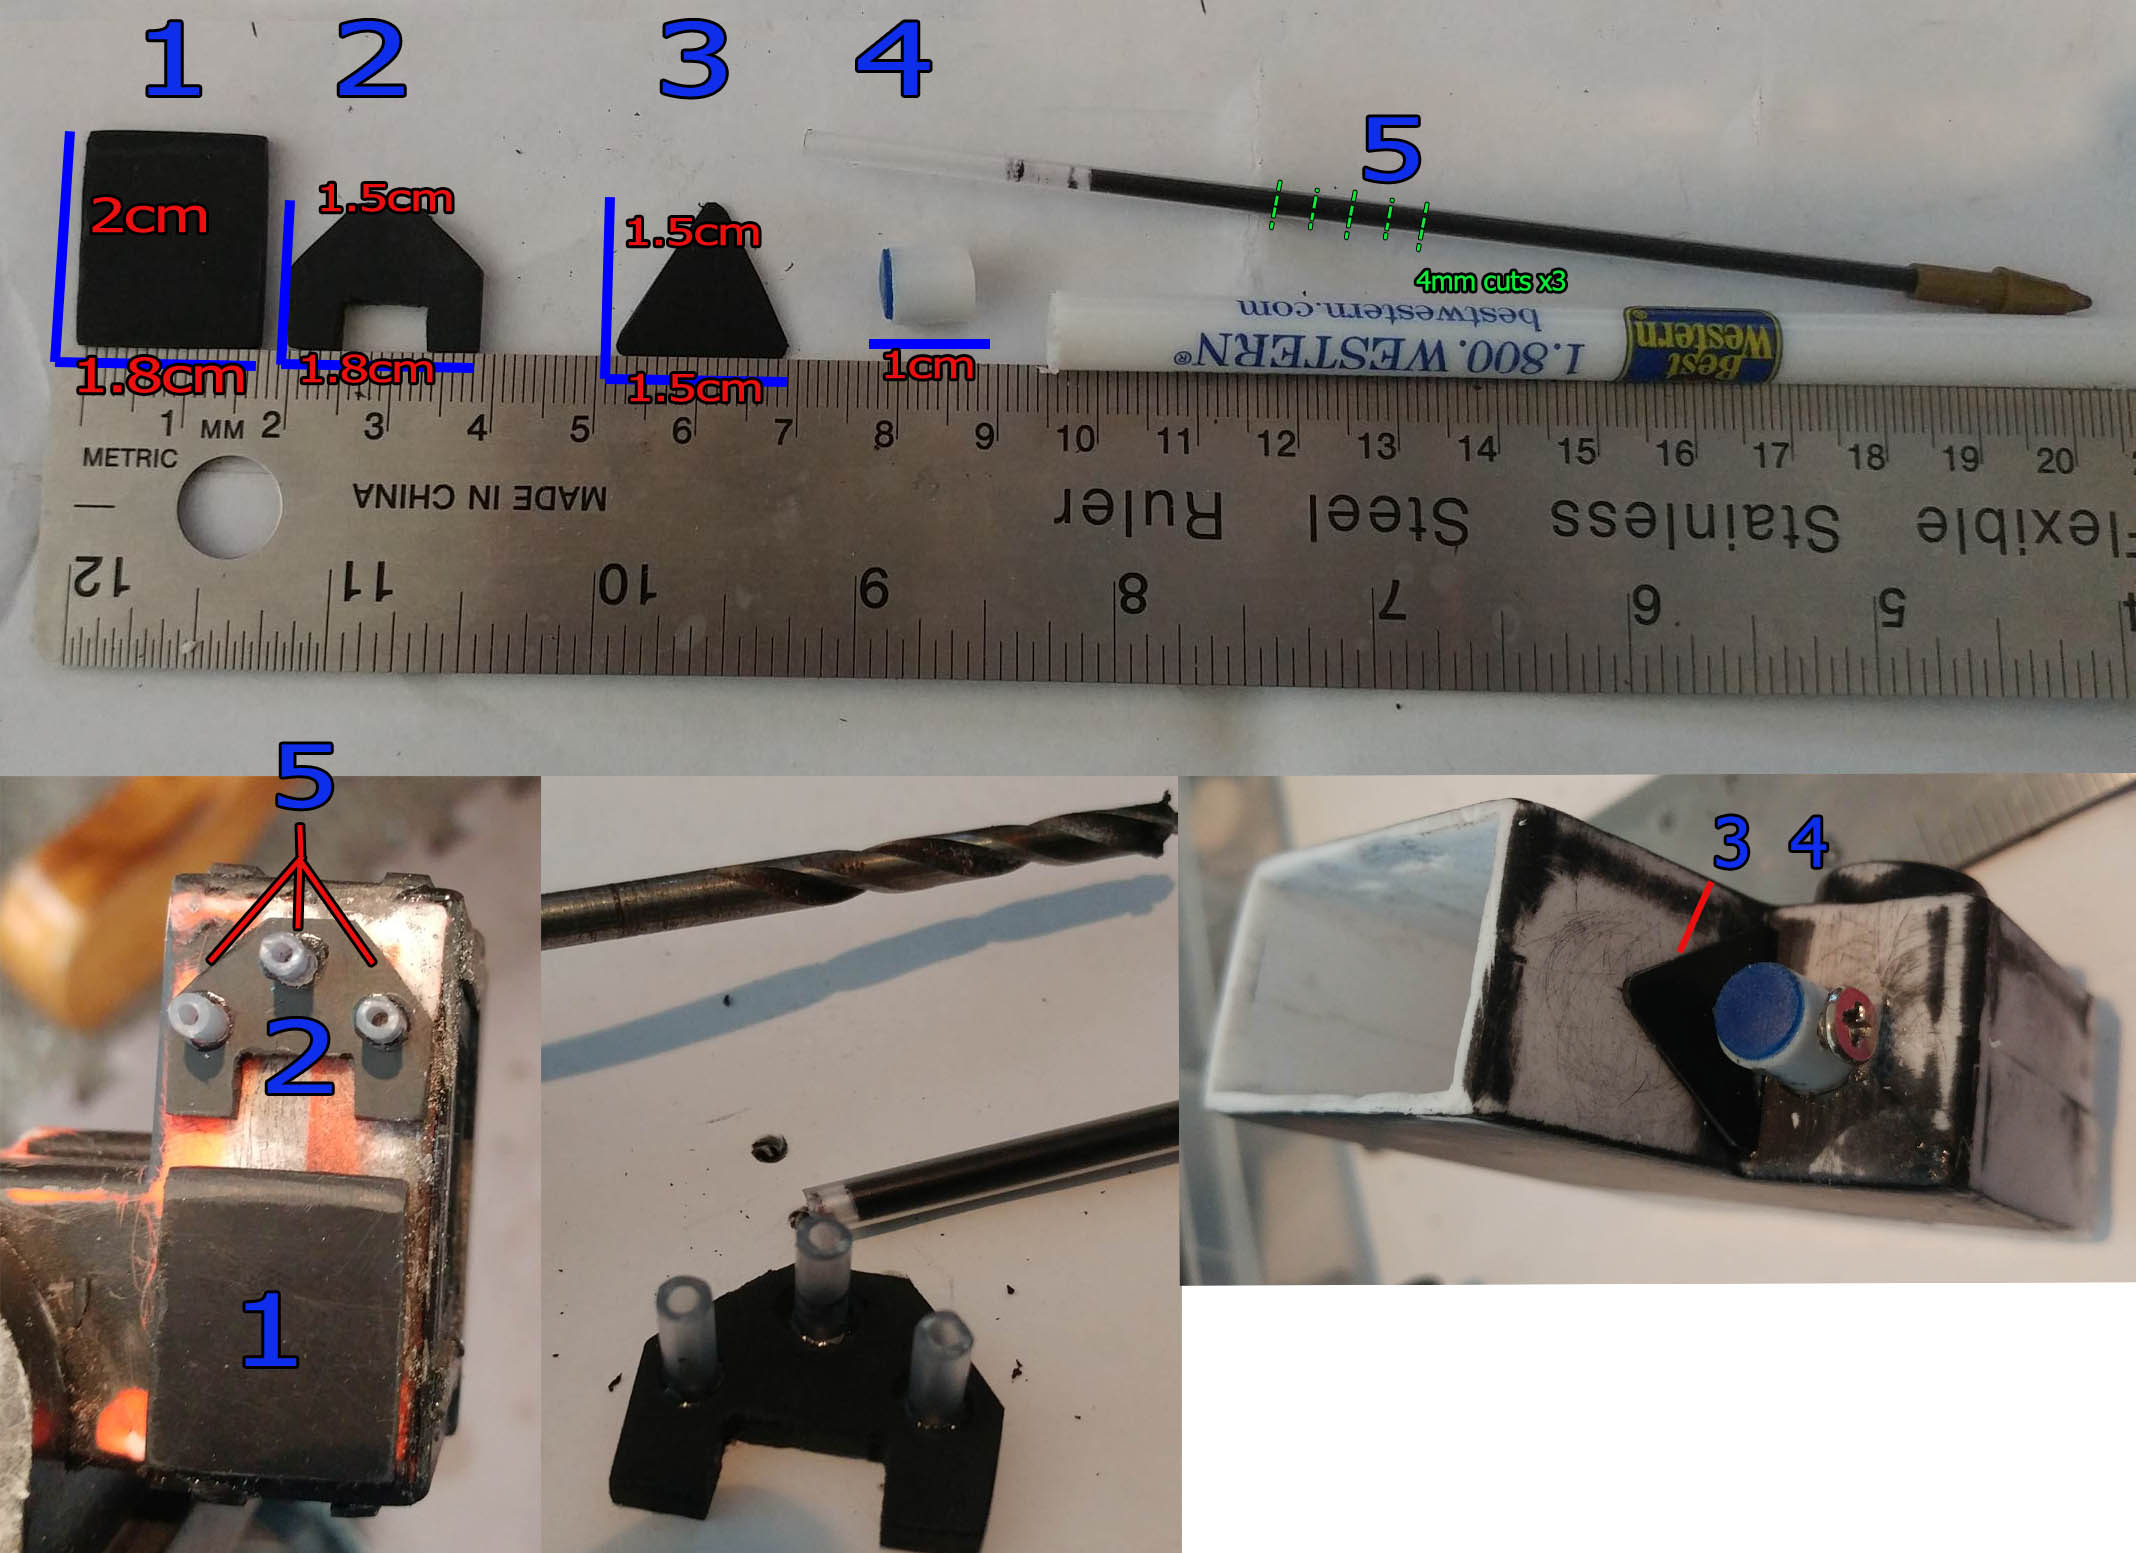
Mag well Bits:
- Cut a 1.5cm x 1.5cm square
- Mark the center top edge
- Cut from the bottom corners to the top center mark making a triangle
- Round the edges
- Glue to mag well as picture above
- Remove the ‘top’ 1cm of the ball point pen. Cut off the end with cap
- Remove any lettering/raised marking on the pen cap
- Make a small hole big enough for one of the small body screws (I used a different once, because I accidentally threw them out)
- Put the screw into the hole, you may need to cut the screw down to fit
- Glue this piece to the mag well as pictured above with the screw top pointing away from the mag well
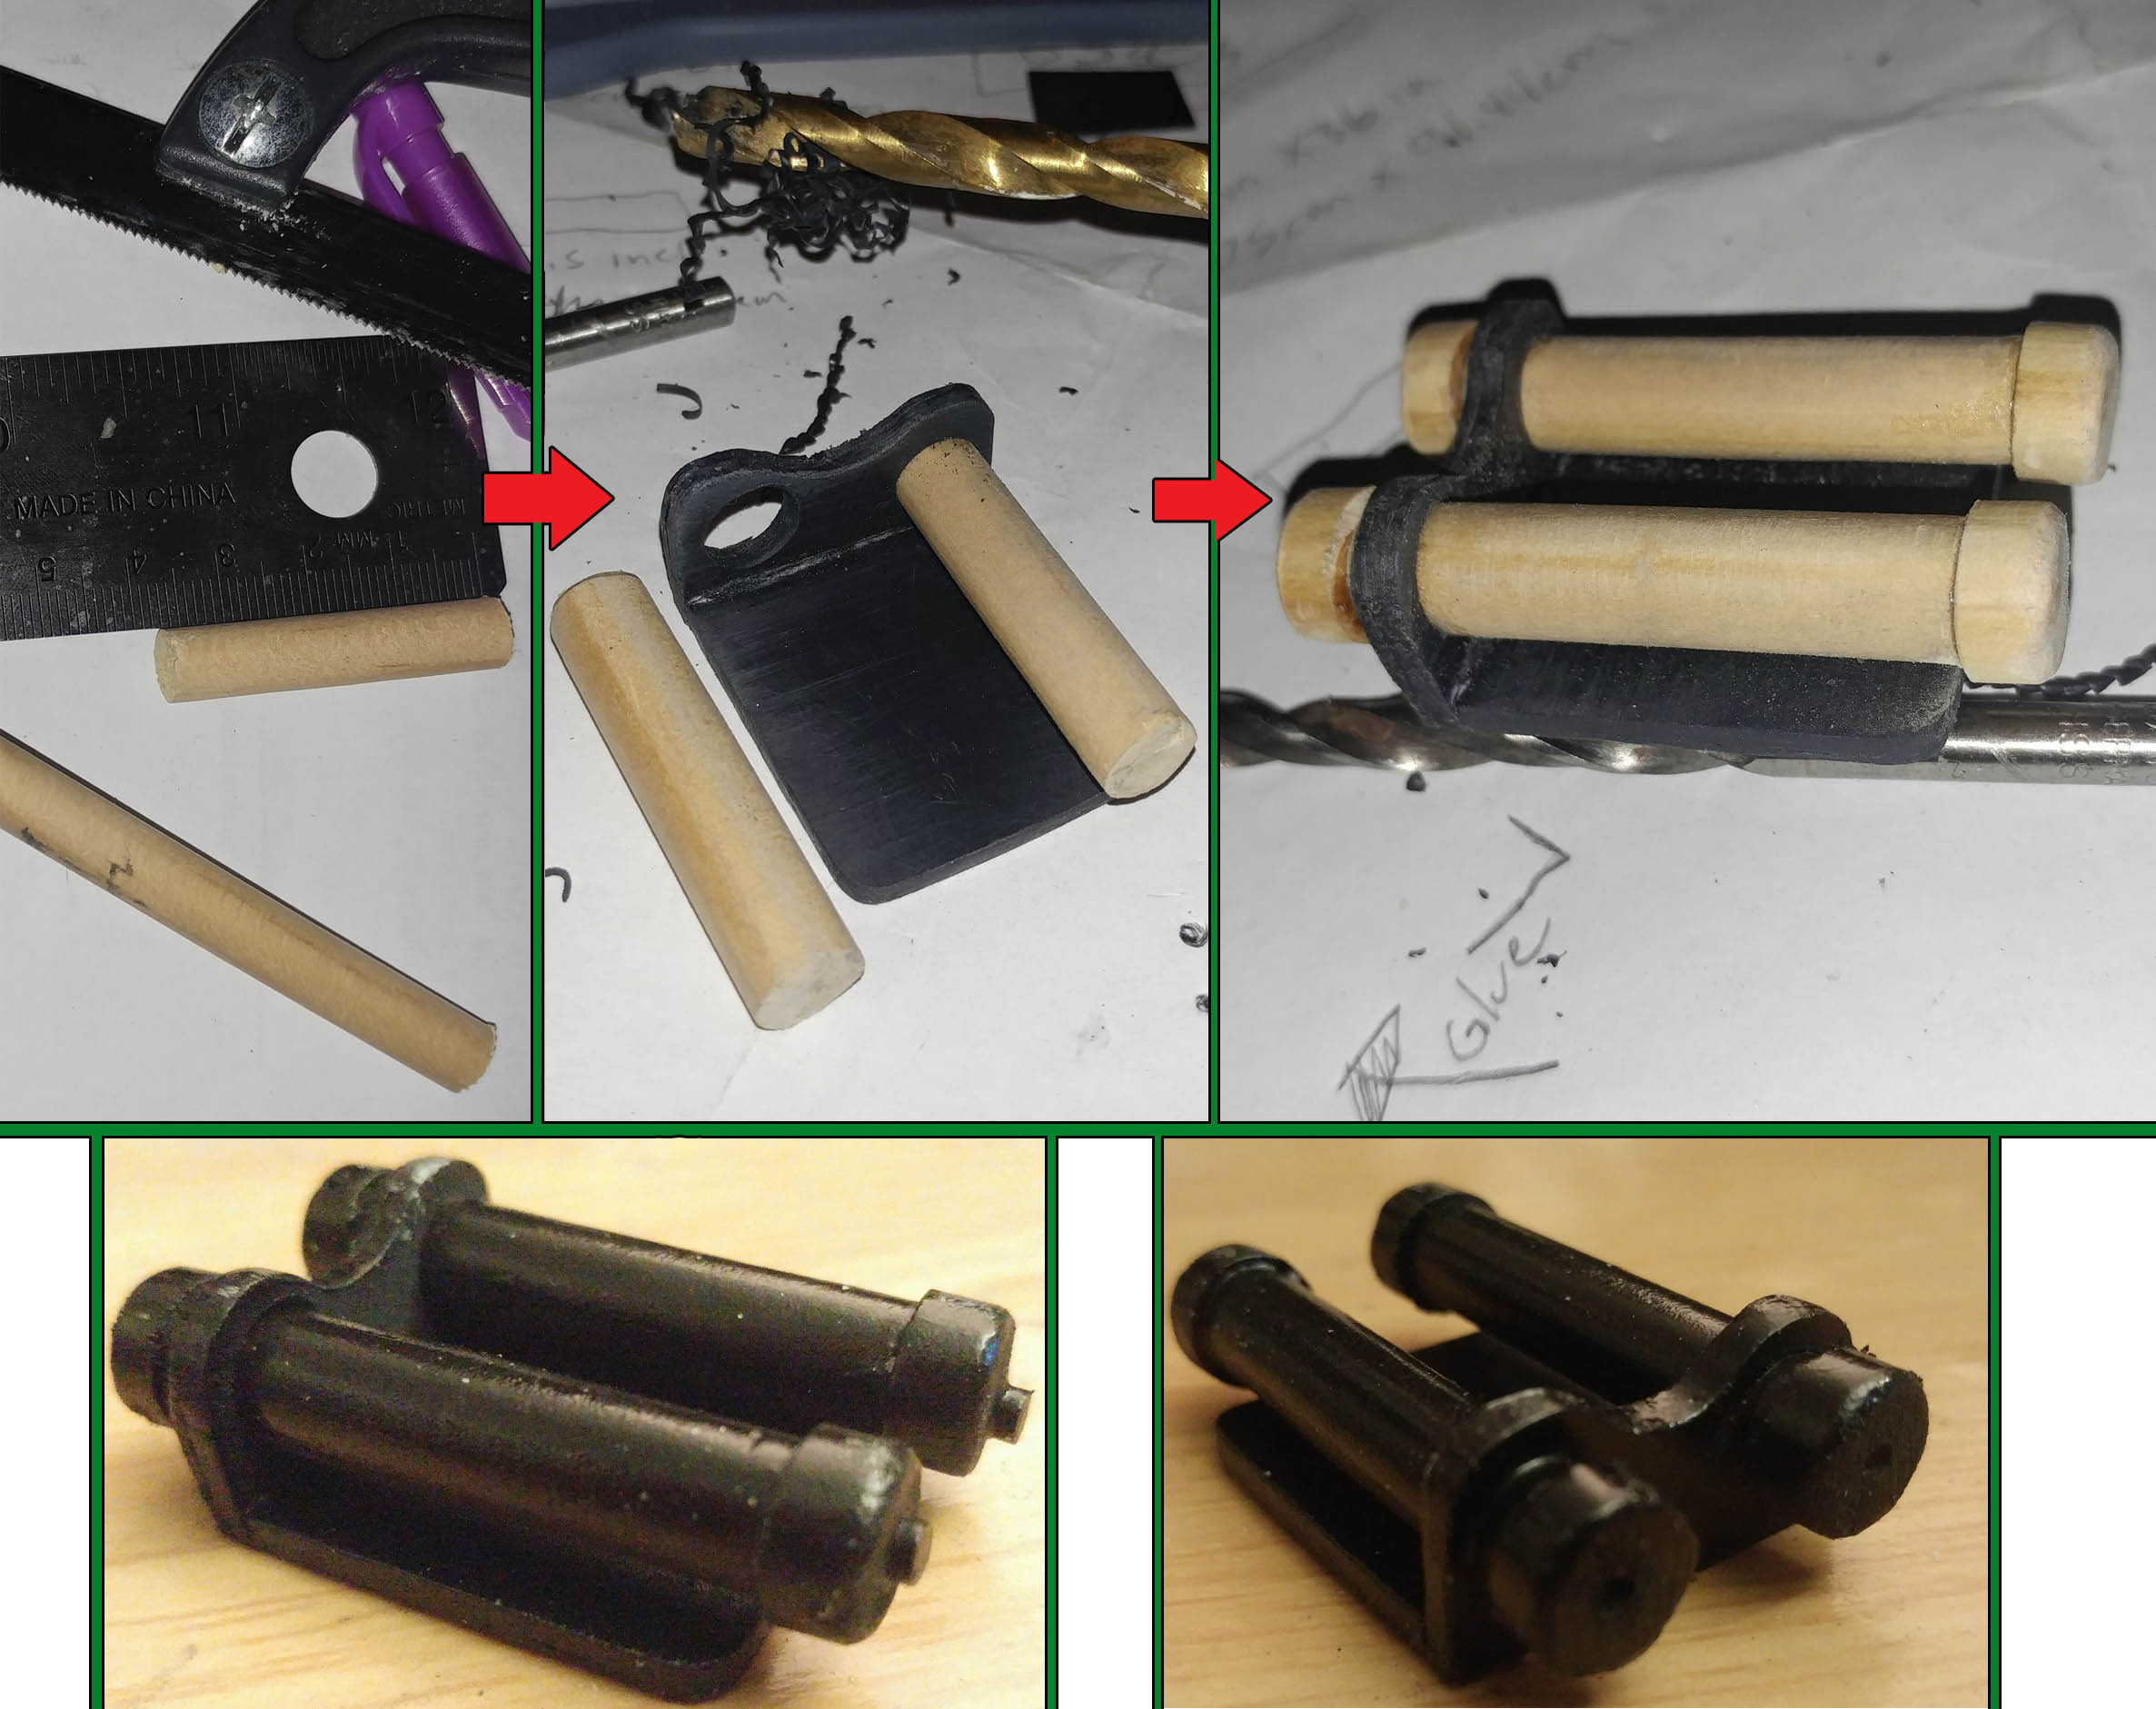
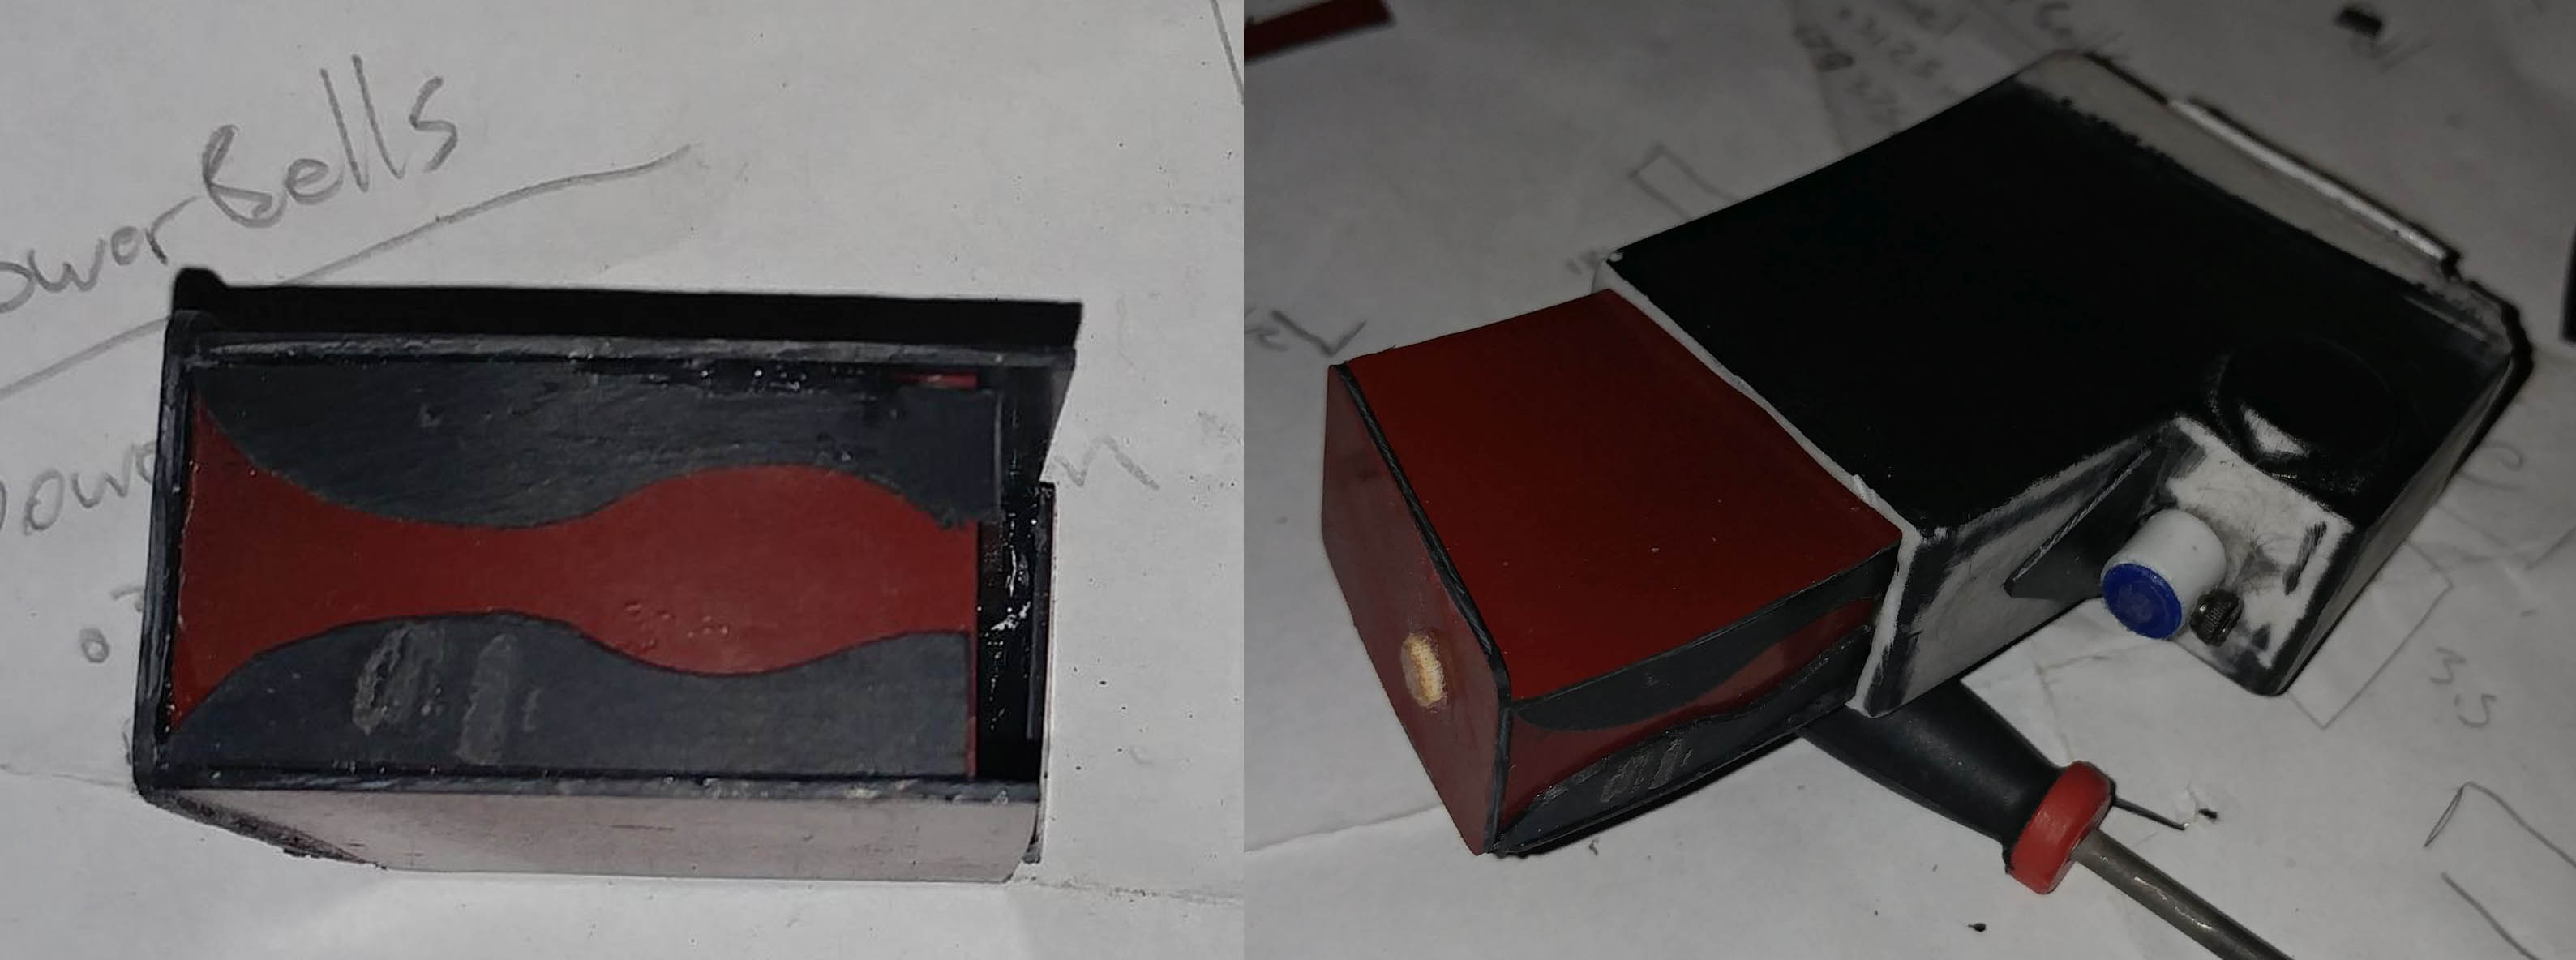
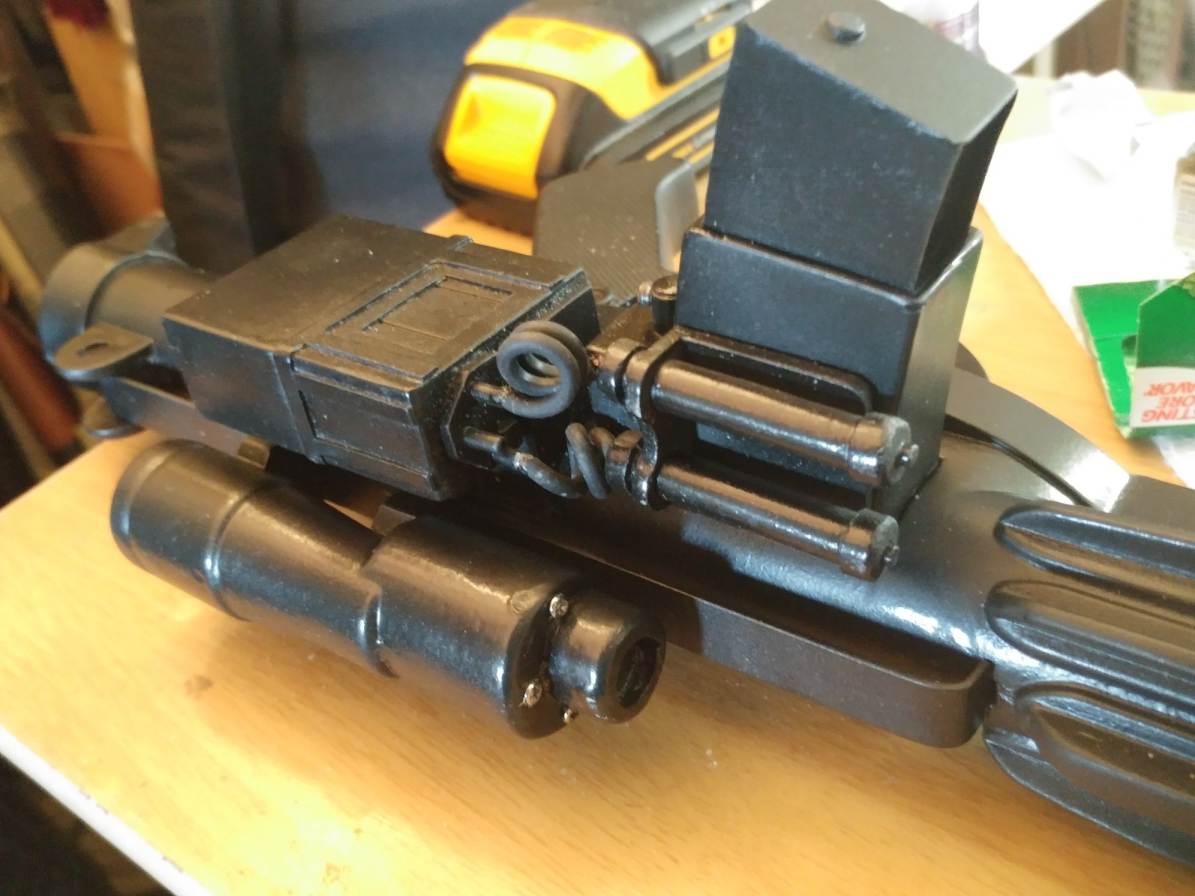
Step Six: Unlimited Power Cells
Power Cells are those two tubes you see mounted to the top of the mag well on E-11’s. In the past I used dead AAA size batteries for this. However recently the alkaline has started leaking out on one of my blasters and it is a mess. So for this build we are going to use two different sized wooden dowels.
What you will need:
Wood Dowel/rods (again sorry for the weird measurements, I’m just going off what it was labeled in store)
- .3125inch Rod
- .79375cm Rod
- 1mm thick plastic
Mount:
We first need a solid base to mount the cells on. This will be two* pieces of plastic glued into an L shape.
- The base is three 3cm x 2.5cm rectangles cut and glued together
- round two corners on the shorter side (only on one side though)
- The ‘back wall’ is three 1.5cm x 2.5cm rectangles cut and glued together
- Drill two holes the width smaller dowel (use the last image below to for a basis)
- Round off the top edge (again as in the last image)
- Glue the two plastic pieces together in an ‘L’-Shape
- Cut two 1.5inch long segments of the smaller dowel (Cells)
- Cut four 5mm segments of the larger dowel (End Caps)
- Insert the smaller dowels into the holes in the mount
- Glue the four end caps to the cells
- Using sand paper/file round the edges of the front end caps
- Drill holes into the center of the all the caps, the same size as the pen ink tubes from earlier
- Insert ink tube segments into the forward holes and trim to about 1mm
- Fill ink tubes with superglue (once it dries it will hold the tube in place and make a faux cap)
- Once the glue is dry sand the glue/tube flat.
*Please note,I’m a little behind schedule, there may not be as many pictures as I kind of went into “Day Before Comic Con” Mode and did a punch of stuff at the same time or did skipped some steps and then came back.
Step Seven: Magazine. I’m a little behind schedule, no time for puns.
Remember when I told you to cut off the magazine? Well, now we are going to make and add a slightly better looking one.
- Go grab the old magazine and trace it on to a sheet of plastic twice
- Cut out the two templates
- Place one template into the the mag well opening. FYI, It won’t fit.
- Trim the long edge until it fits snugly.
- Glue these pieces to the top and bottom of the mag well opening about 4mm in, not too far in.
For the sides:
- Measure the size of the game between the top and bottom magazine piece
- Cut rectangles that fit the gap (literally didn’t take pictures of this part, sorry!)
- For the forward facing side, glue the piece about 2mm inside from the edge of the top and bottom piece
- For the rear facing side, glue the piece 1mm in from the edges
- To cap it off, again cut a rectangle that will cover the bottom, round the edges.
The rear facing side has this weird wavy addition to it (see below). Do like above, and cut some plastic. You know the drill.
To finish off the magazine we need to find something to represent a rivet on the bottom of the magazine. I made a 1mm x 2mm disc from a scrap wooden dowel. I think you could get away with using one of the body screws we took out earlier. this ‘dot’ is glued on in the center of the base plate about 1cm from the rear facing side (see above).
Super glue the whole mag well unit into the body of the gun. Then glue the power cylinders to tope of the mag well having the cylinders parallel wit the body. Looks pretty good now, huh?!
Step Eight: Scoping things Out (have I used this one yet?)
Let’s get the scope attached to that bar we made, sound good? You will need:
- Scope
- Mounting Rail
- A drill and bit
- x2 socket cap screws (see below image for packaging info)
- x3 screws from the body of the gun
- Glue
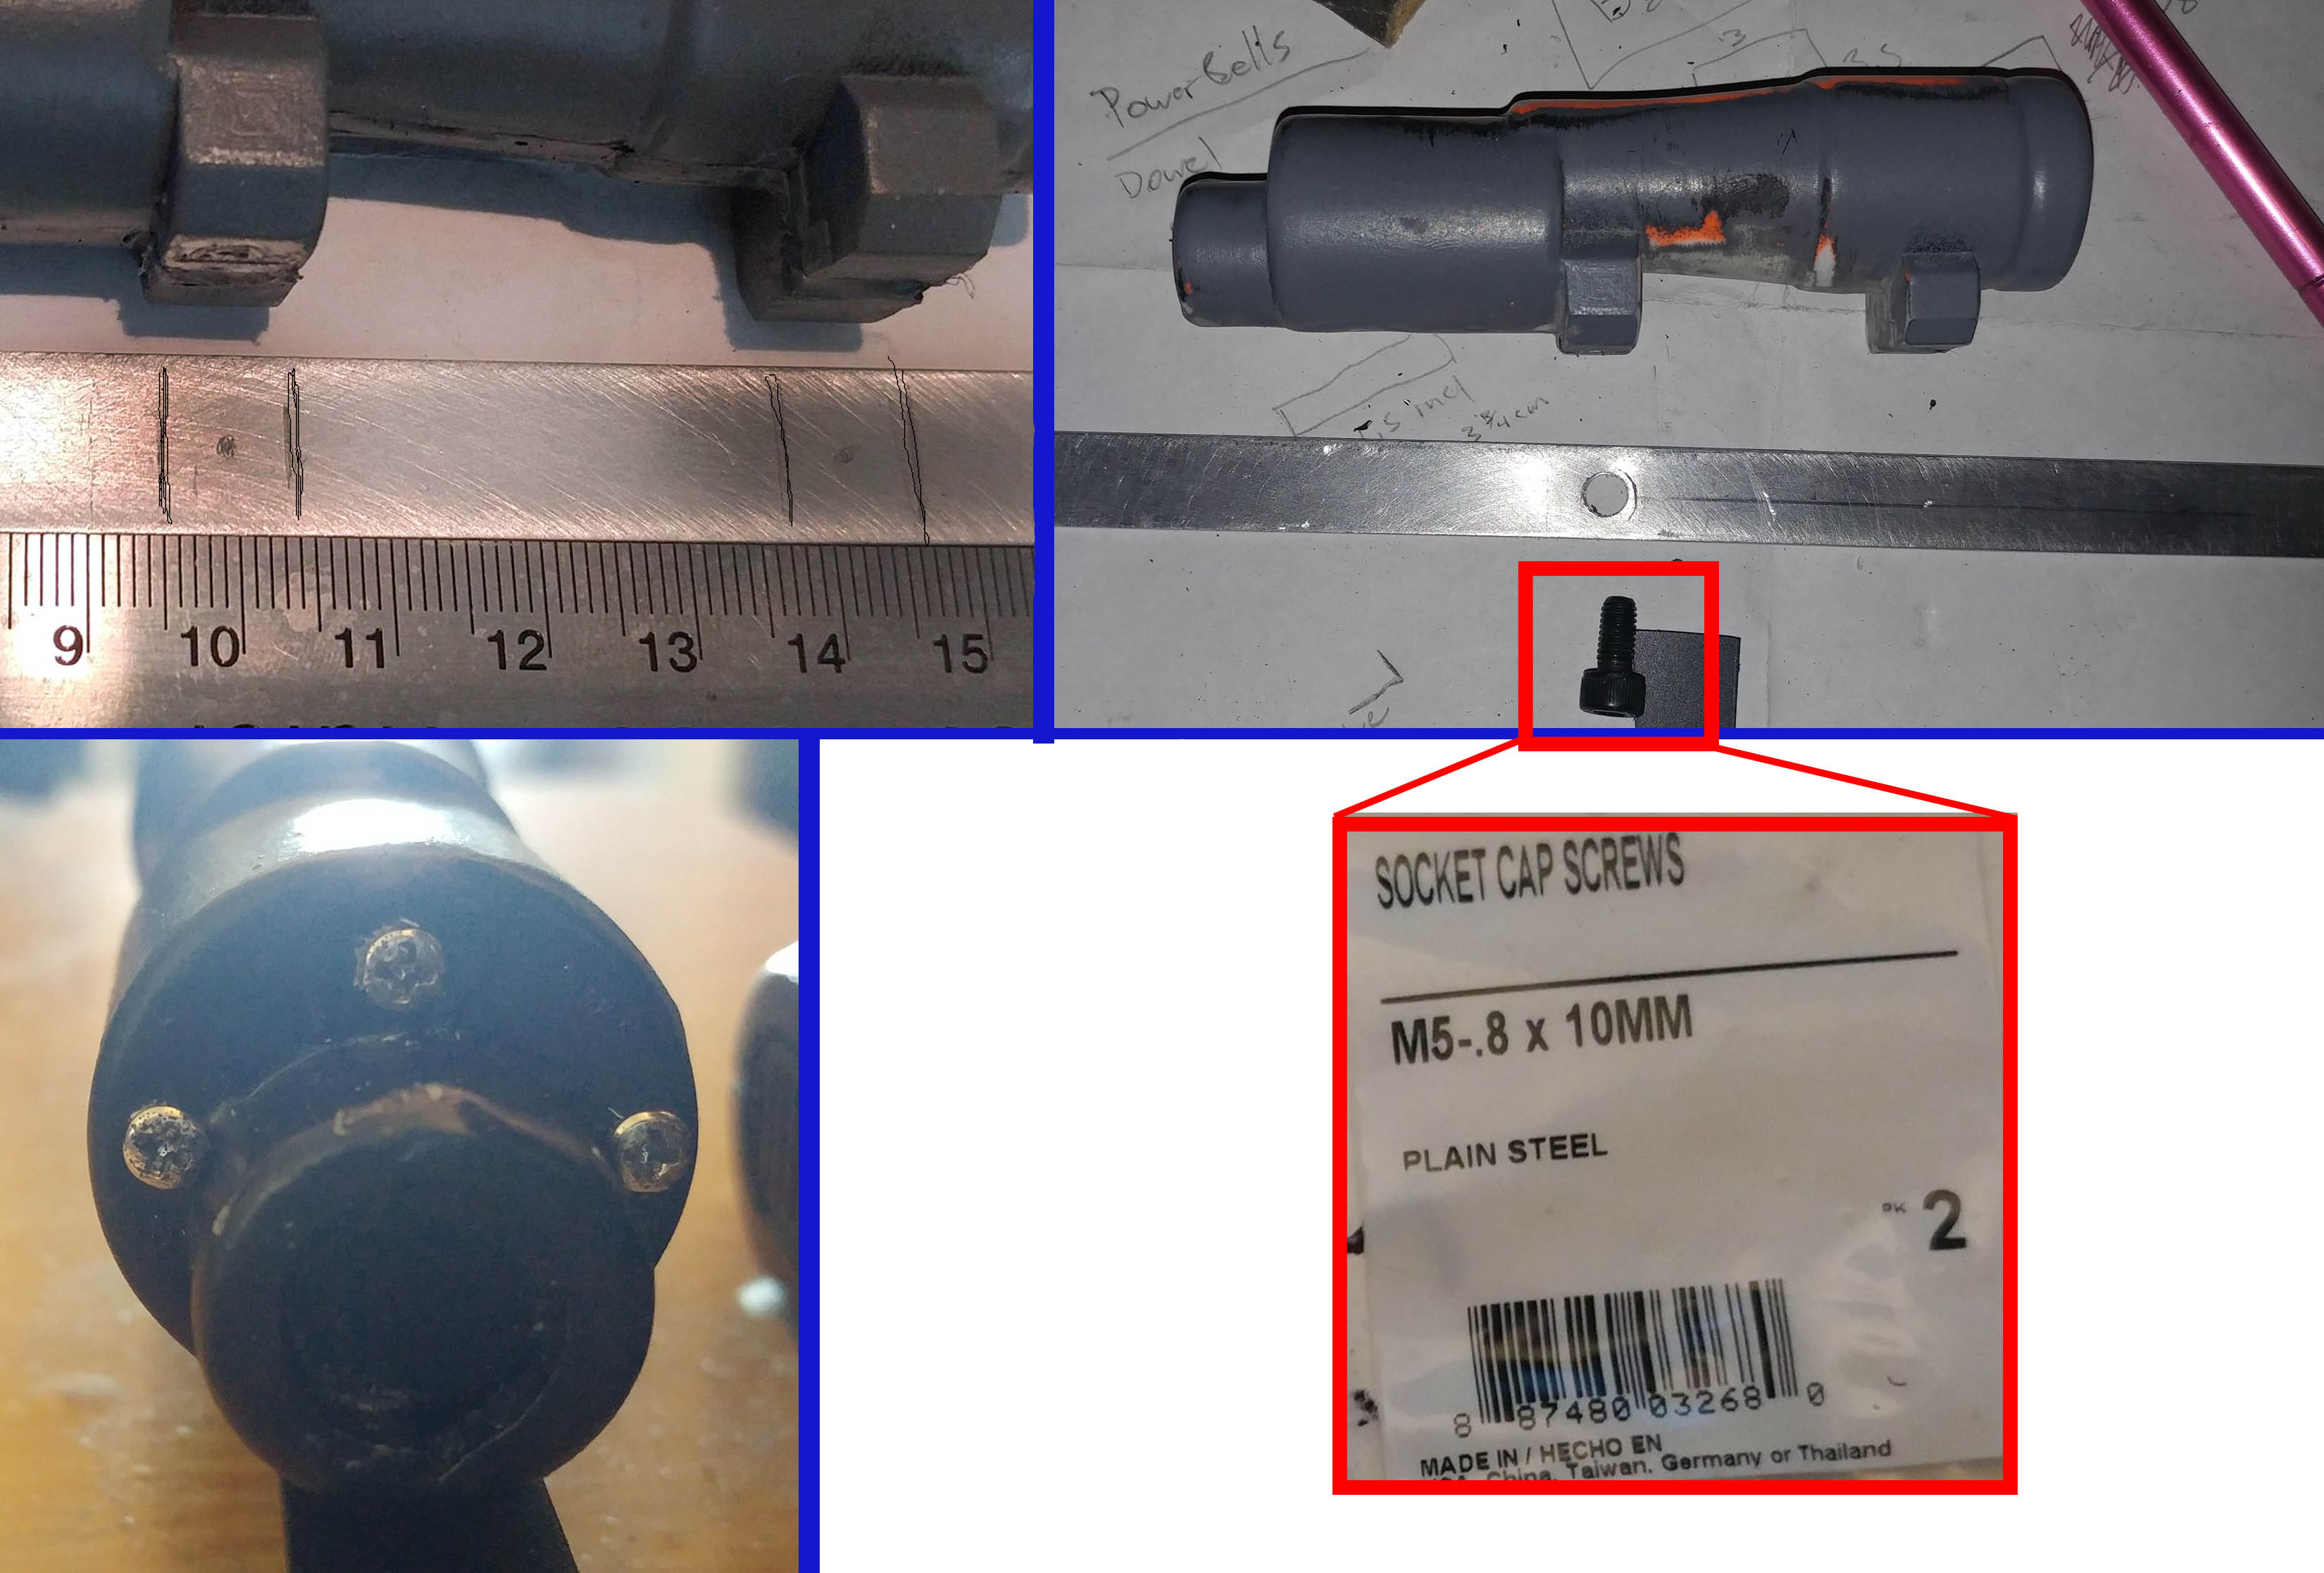
- Place the scope rail next to a ruler and make a mark at 9.5 cm from the bent end
- Take your scope and mark where the ‘legs’ meet the bar (see above)
- Make a mark at the center of these lines
- Drill a hole in the bar large enough for the Socket Cap screw to fit
- Drill another hole in the forward ‘leg’ of the scope
- Test fit the screw attaching the bar to the scope.
- Double check alignment of rear screw placement and adjust if necessary
- Repeat the steps for the rear scope leg/hole in bar/screw.
- Glue the screws in place for safety
For the front of the scope, we are going to drill three holes around the smaller circle (see above picture):
- Top Center
- Center Left
- Center Right
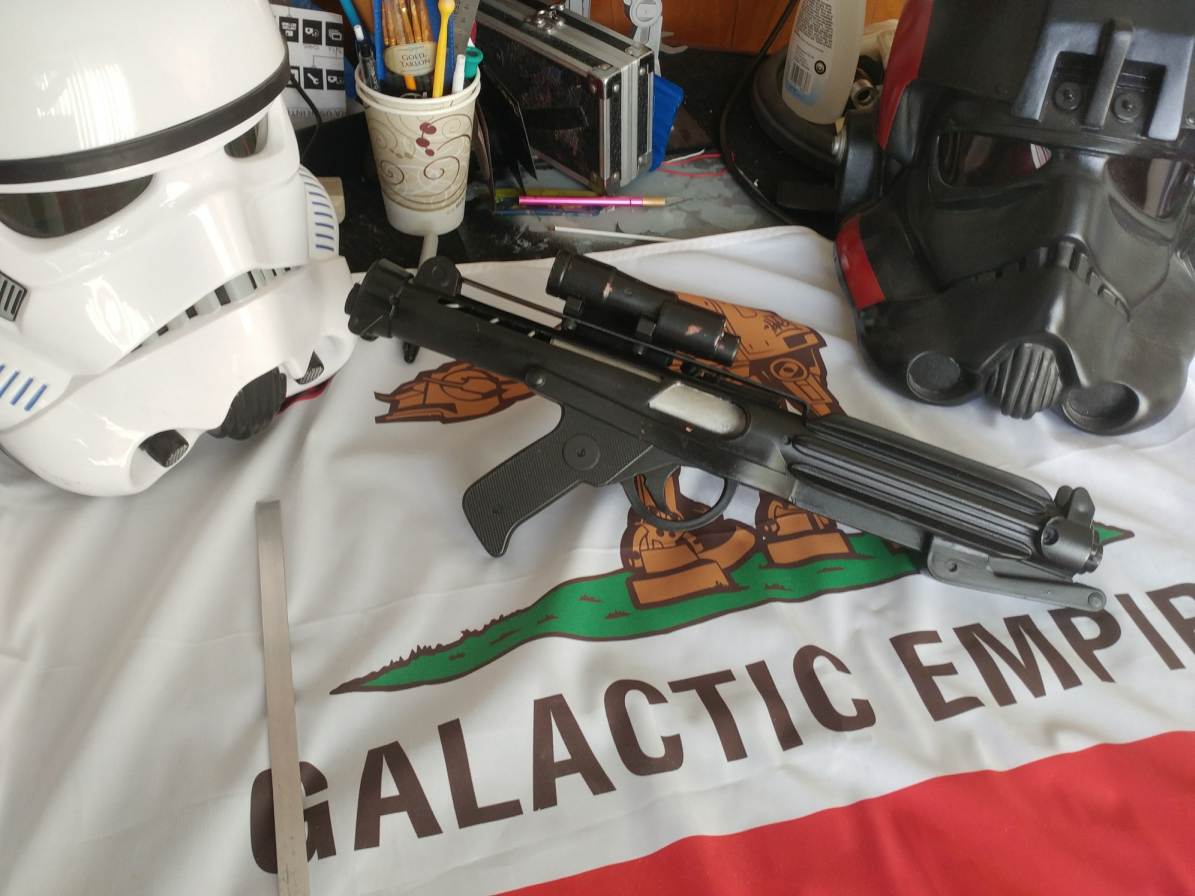
Once the holes are drilled, insert the body screws. And that’s it. Simple, yah? Now test fit the scope and bar to the blaster, don’t attach it just yet.
Step Nine: Bondo, James Bondo
I’m not going to give you instruction here. I’m really bad with Bondo. But there are some wonderful tutorials on YouTube about how to do it correctly. Unlike me, who does it wrong.
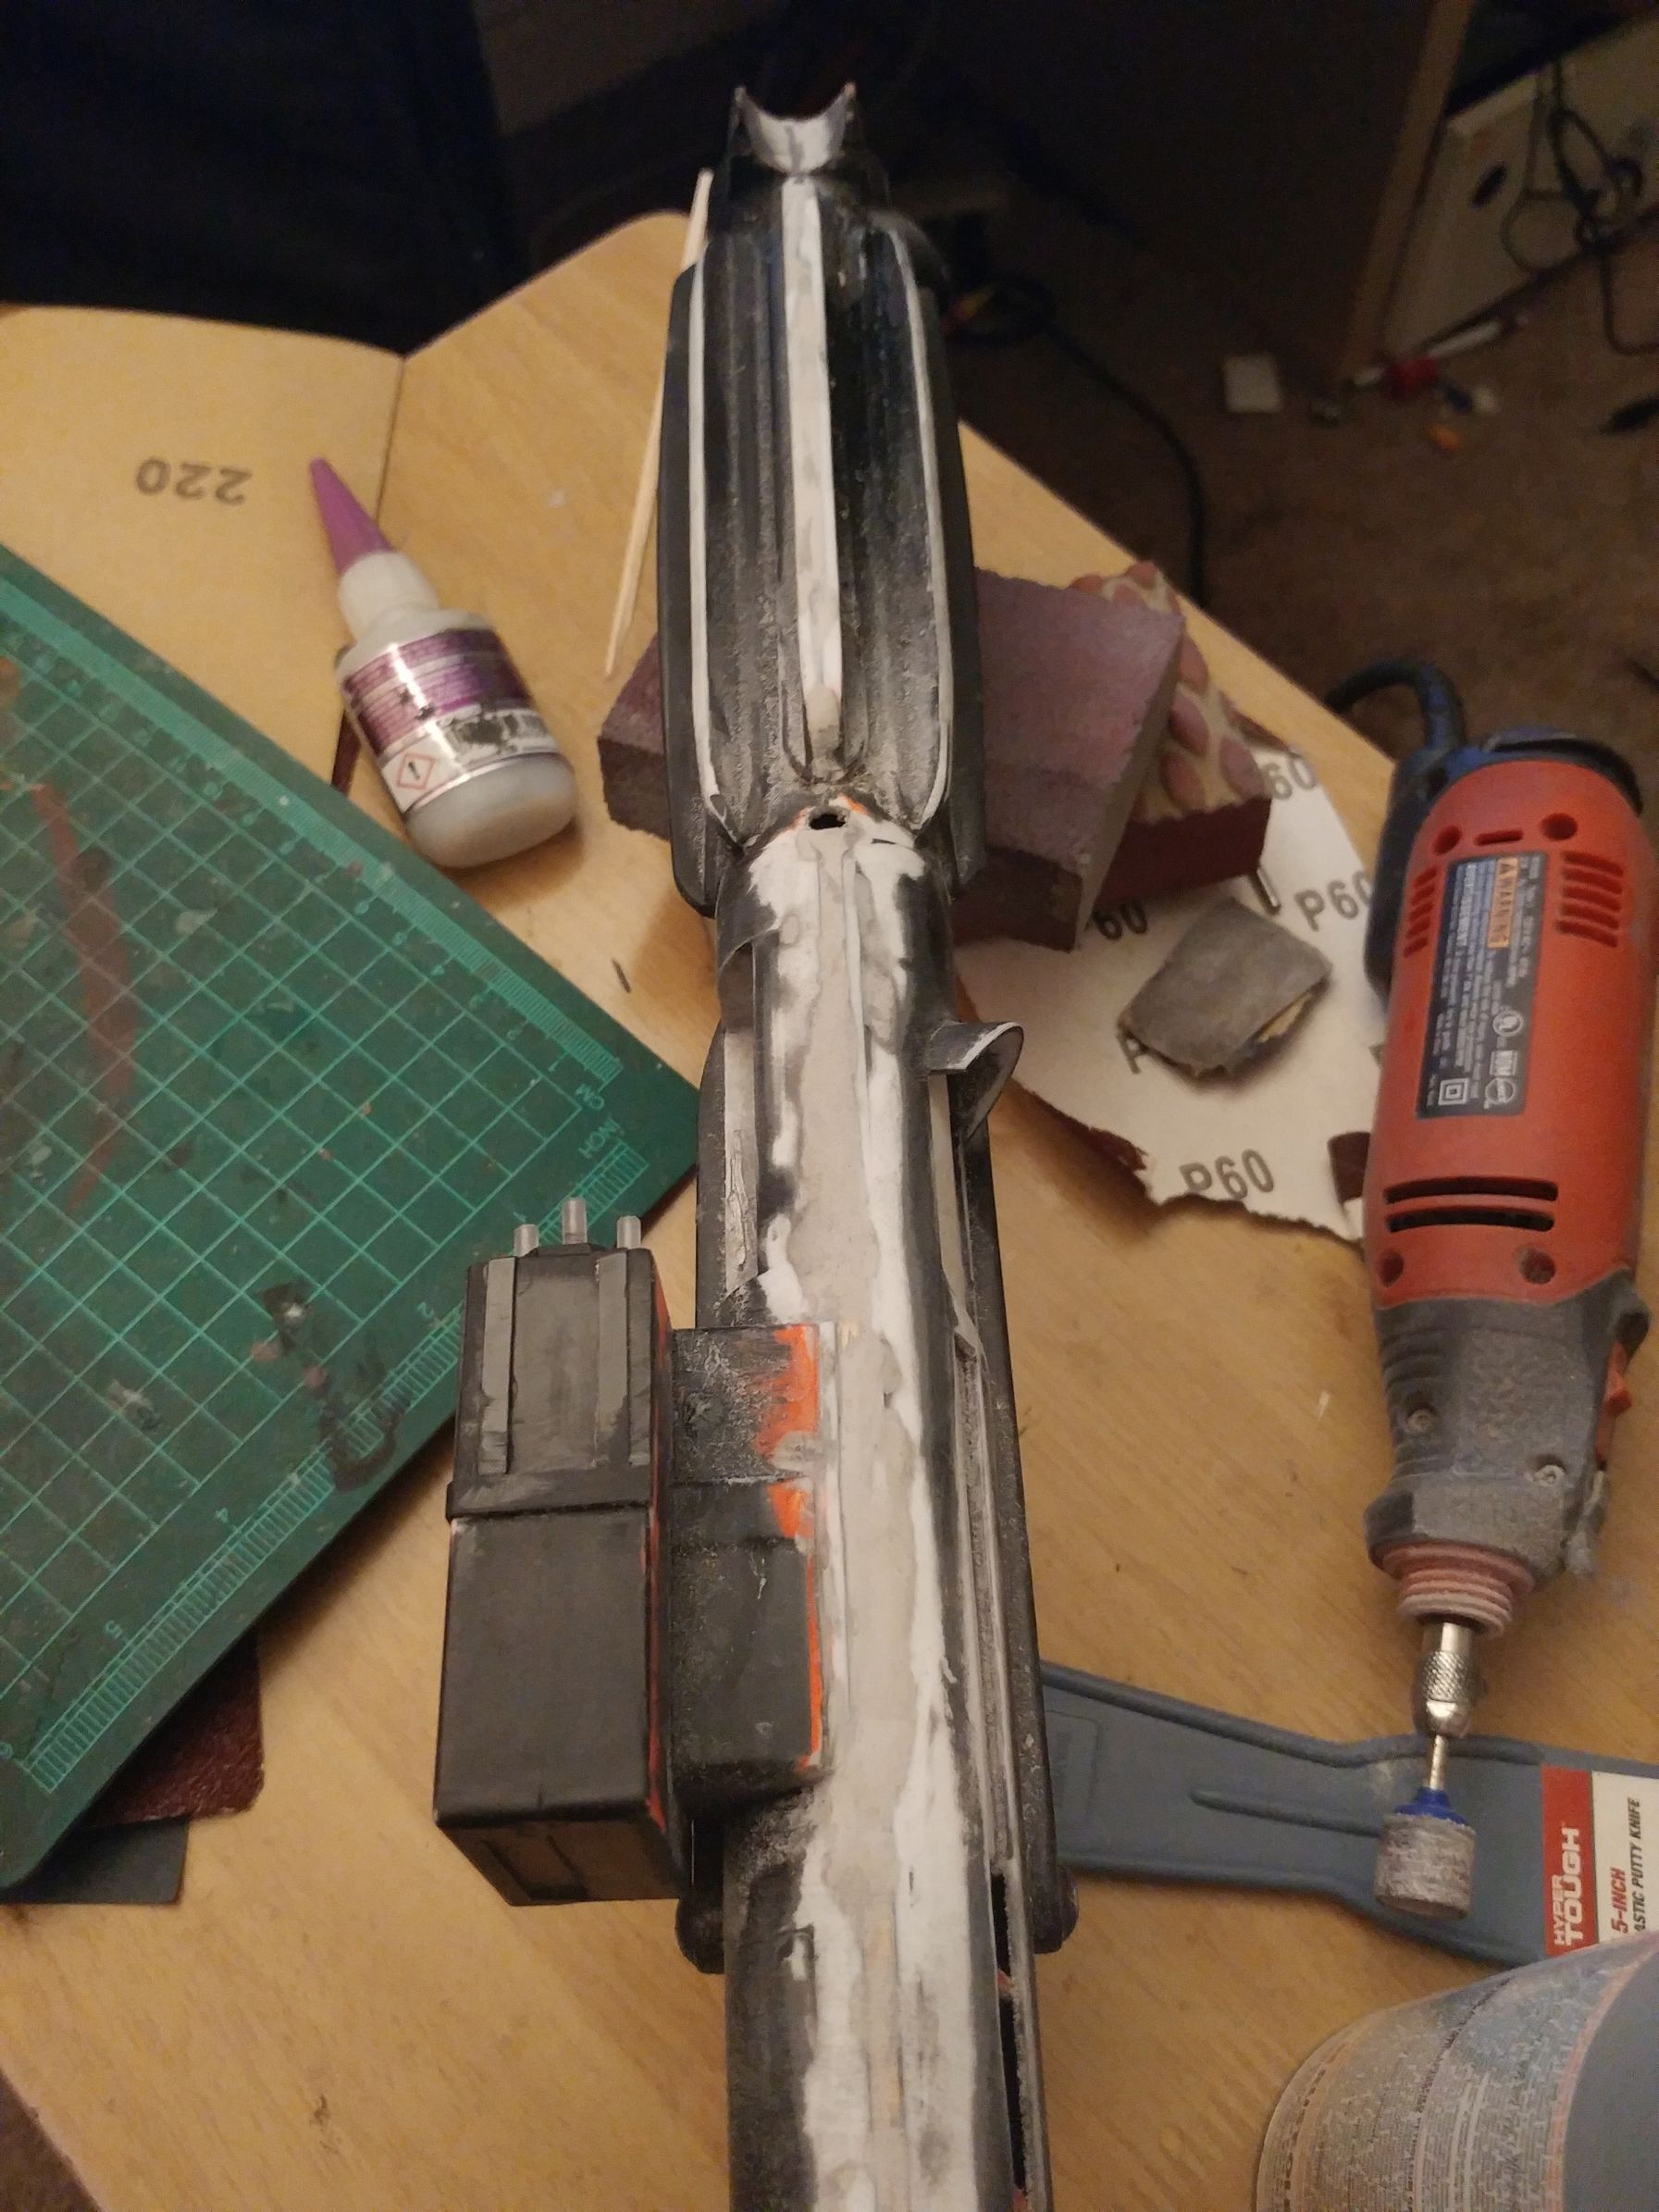
You’re going to use Bondo or another body filler to fix any large gaps in seams, scratches, dents and so on. For smaller gaps, I’ve had some luck with using ‘Gap Filling’ model glue here as well.
This step requires patience. Patience I don’t have right now!
Step Ten: A couple more small steps before painting.
Since I know you did an amazing job with the body filler section. We are almost ready for painting. but first, just a couple more additions.
Screws in the front
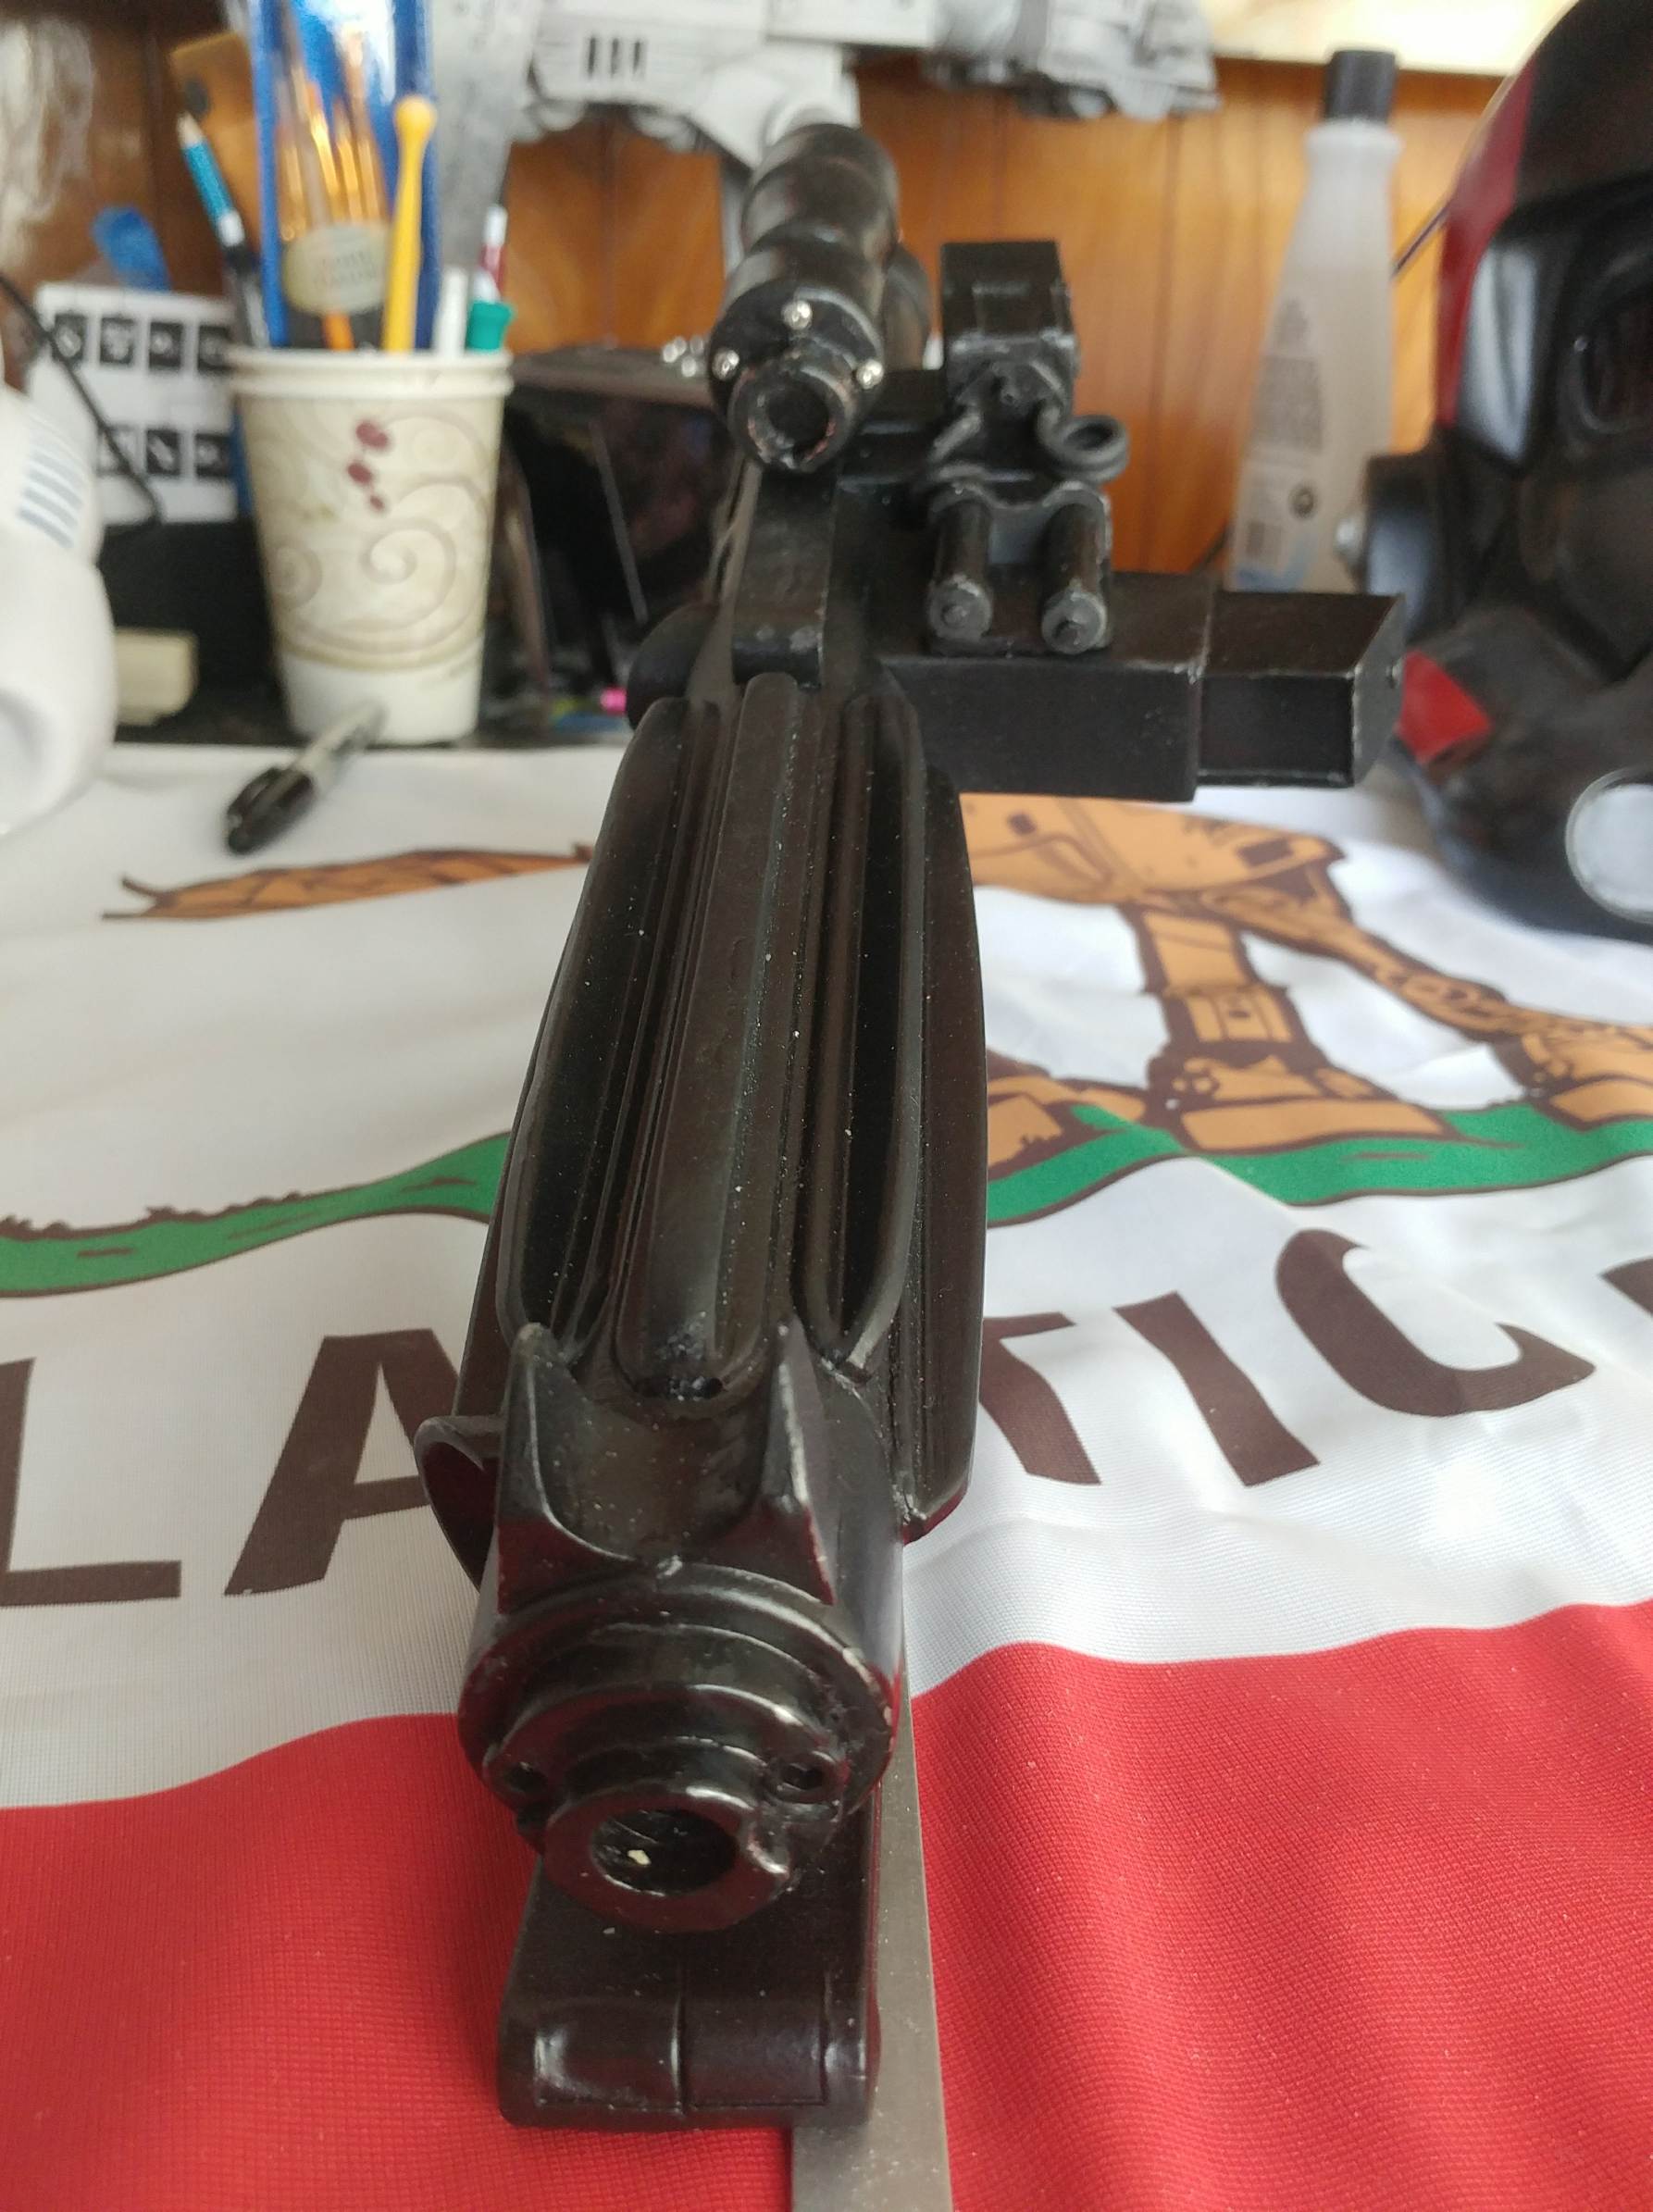
we need to take two of the .7 x 8mm socket cap screws and stick ’em at the front of the gun.
On a real steel Sterling SMG, there are two hex screws on either side of the barrel. The front of our toy needs this added. You will need to use a drill to make the holes.
You will notice that the ‘muzzle’ is made up of 3 terraced rings, the smallest one is offset (it’s like this on the real gun to). The upper one also has a small section removed, this is where one screw goes, the other goes just next to the upper ring (see below). The top of the screws will need to be even with the top of the second ring.
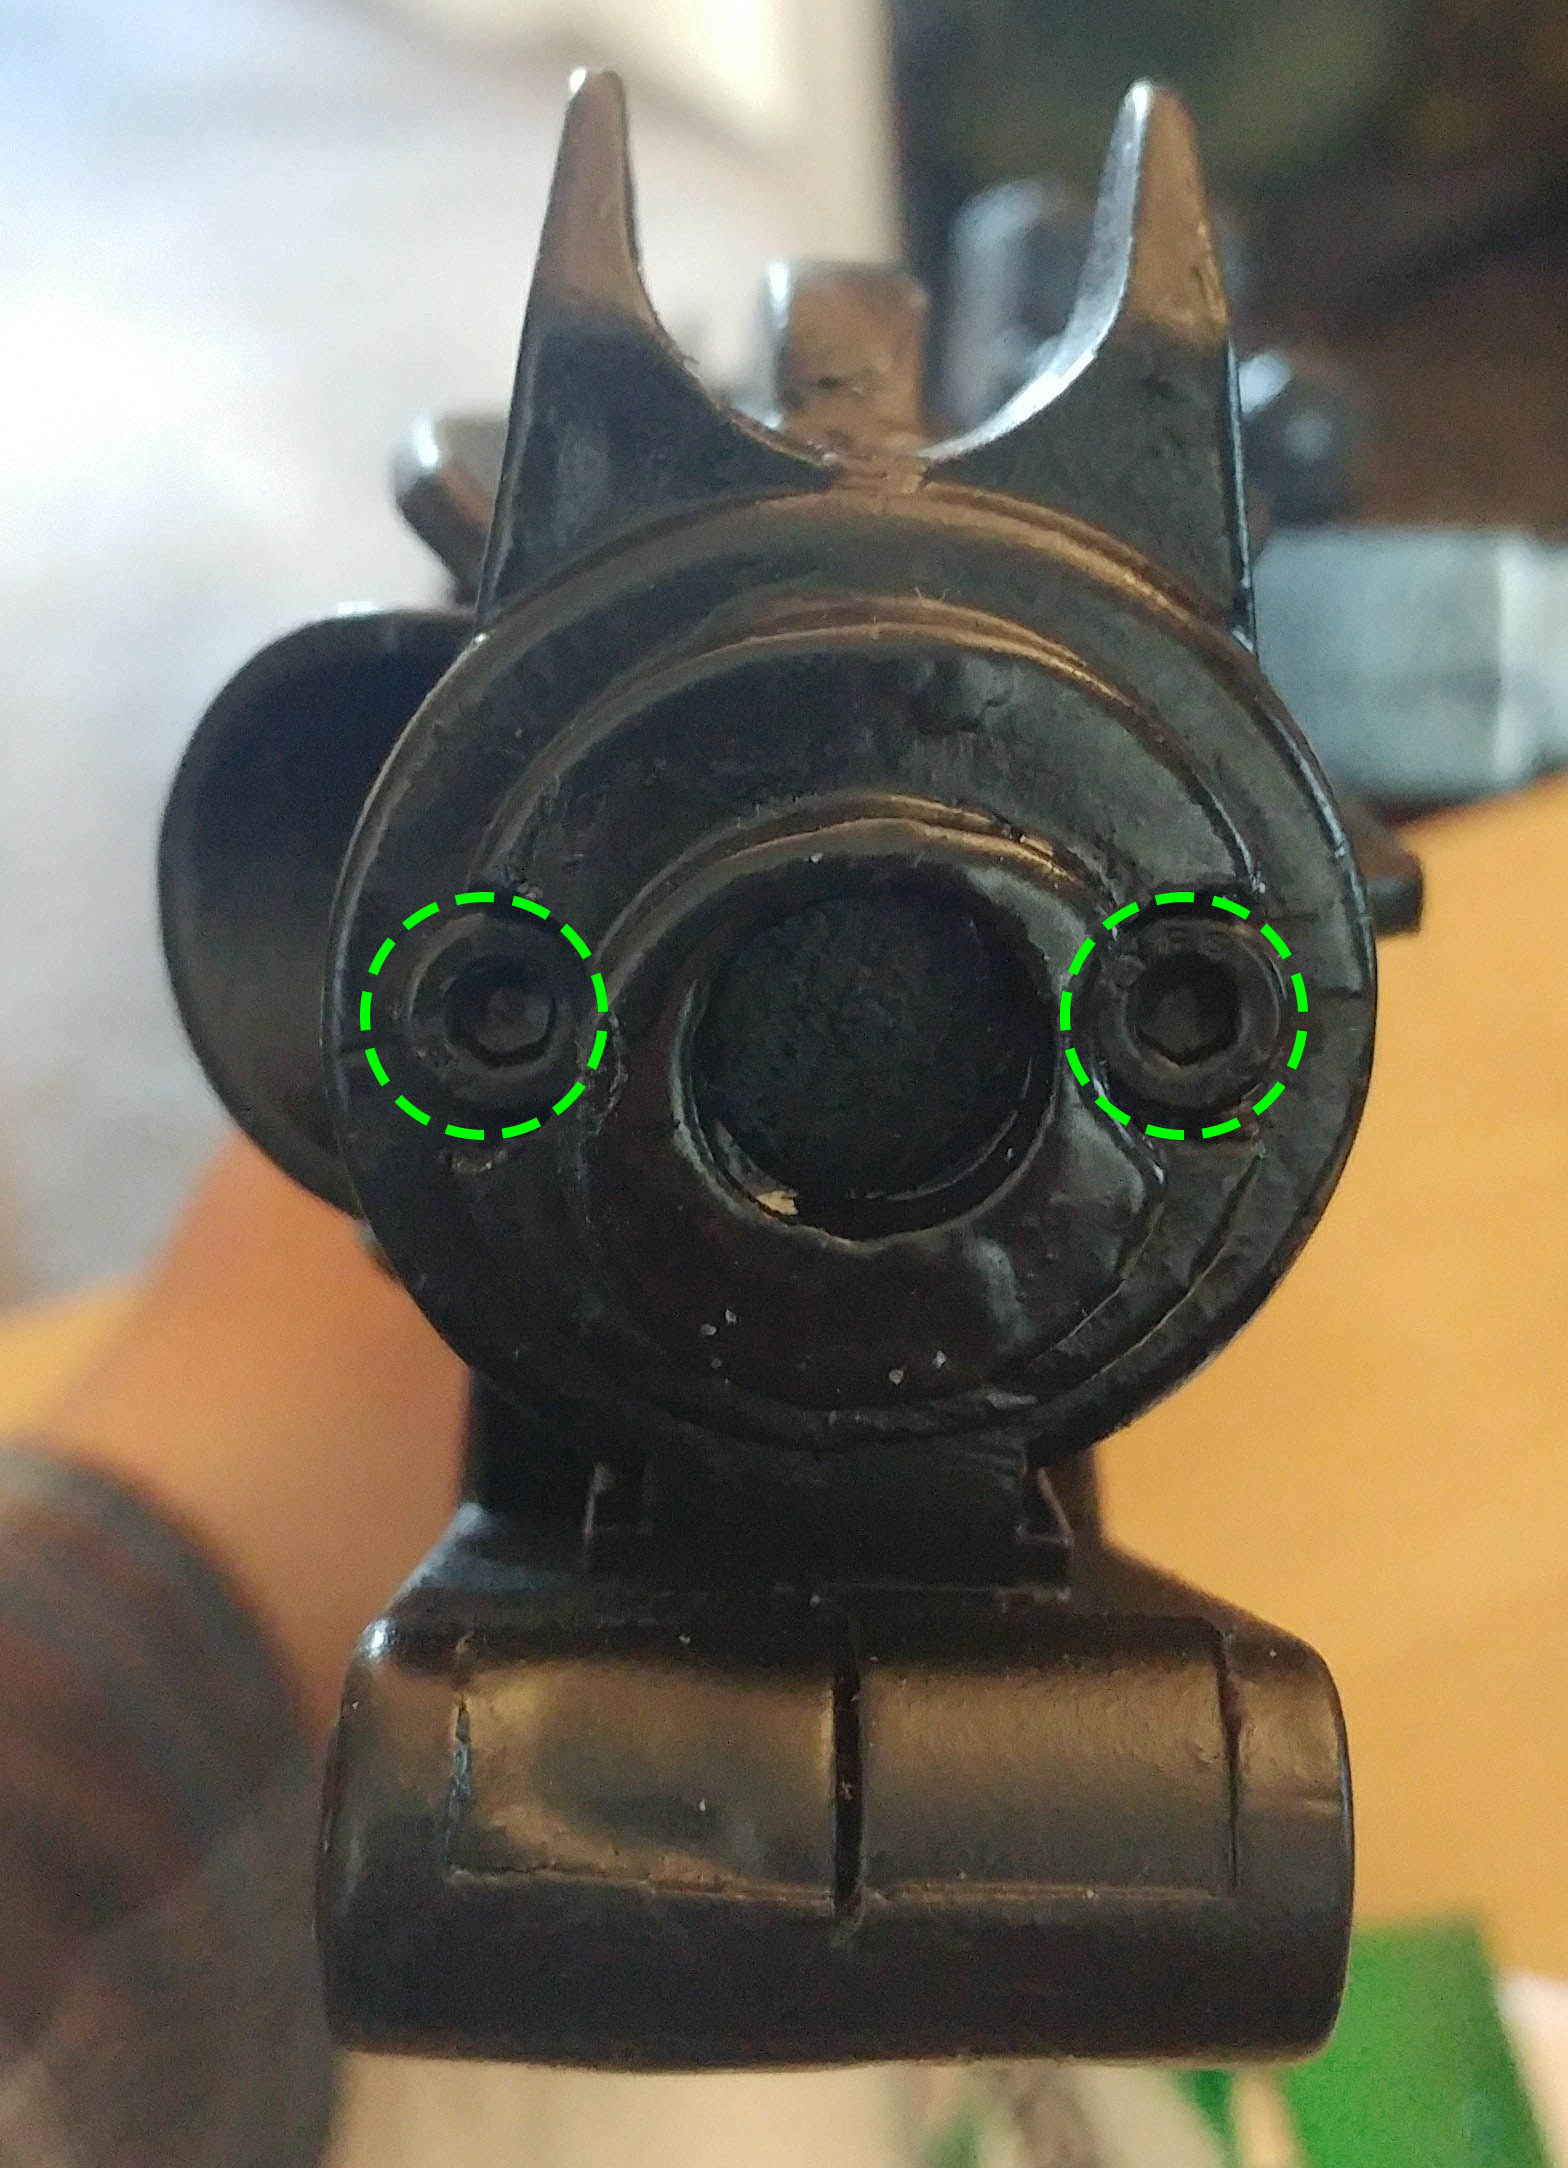
Once the holes are drilled you may need to add a drop of glue to the screw to hold it in place. You know, for safety.
‘Powered’ Cylinders:
This part is easy, take that coiled power cord and cut two (about) 1/2″ inch lengths. Then super glue these cables with one side in the hole in the back of the power cylinders you drilled and the other going into the the end of the pen ink tubes on the front of the ammo counter.
Step 11: The Home stretch, aka painting.
*I’m just going to copy and paste the my second post here. Thats thinking smarter, not harder.
Before you jump right into painting it black. It’s highly recommended that you cover the blaster in a Primer coat first. This helps later with color uniformity (since this blaster two colors) and, for me at least, helps with identifying areas that can be sanded down a little better.
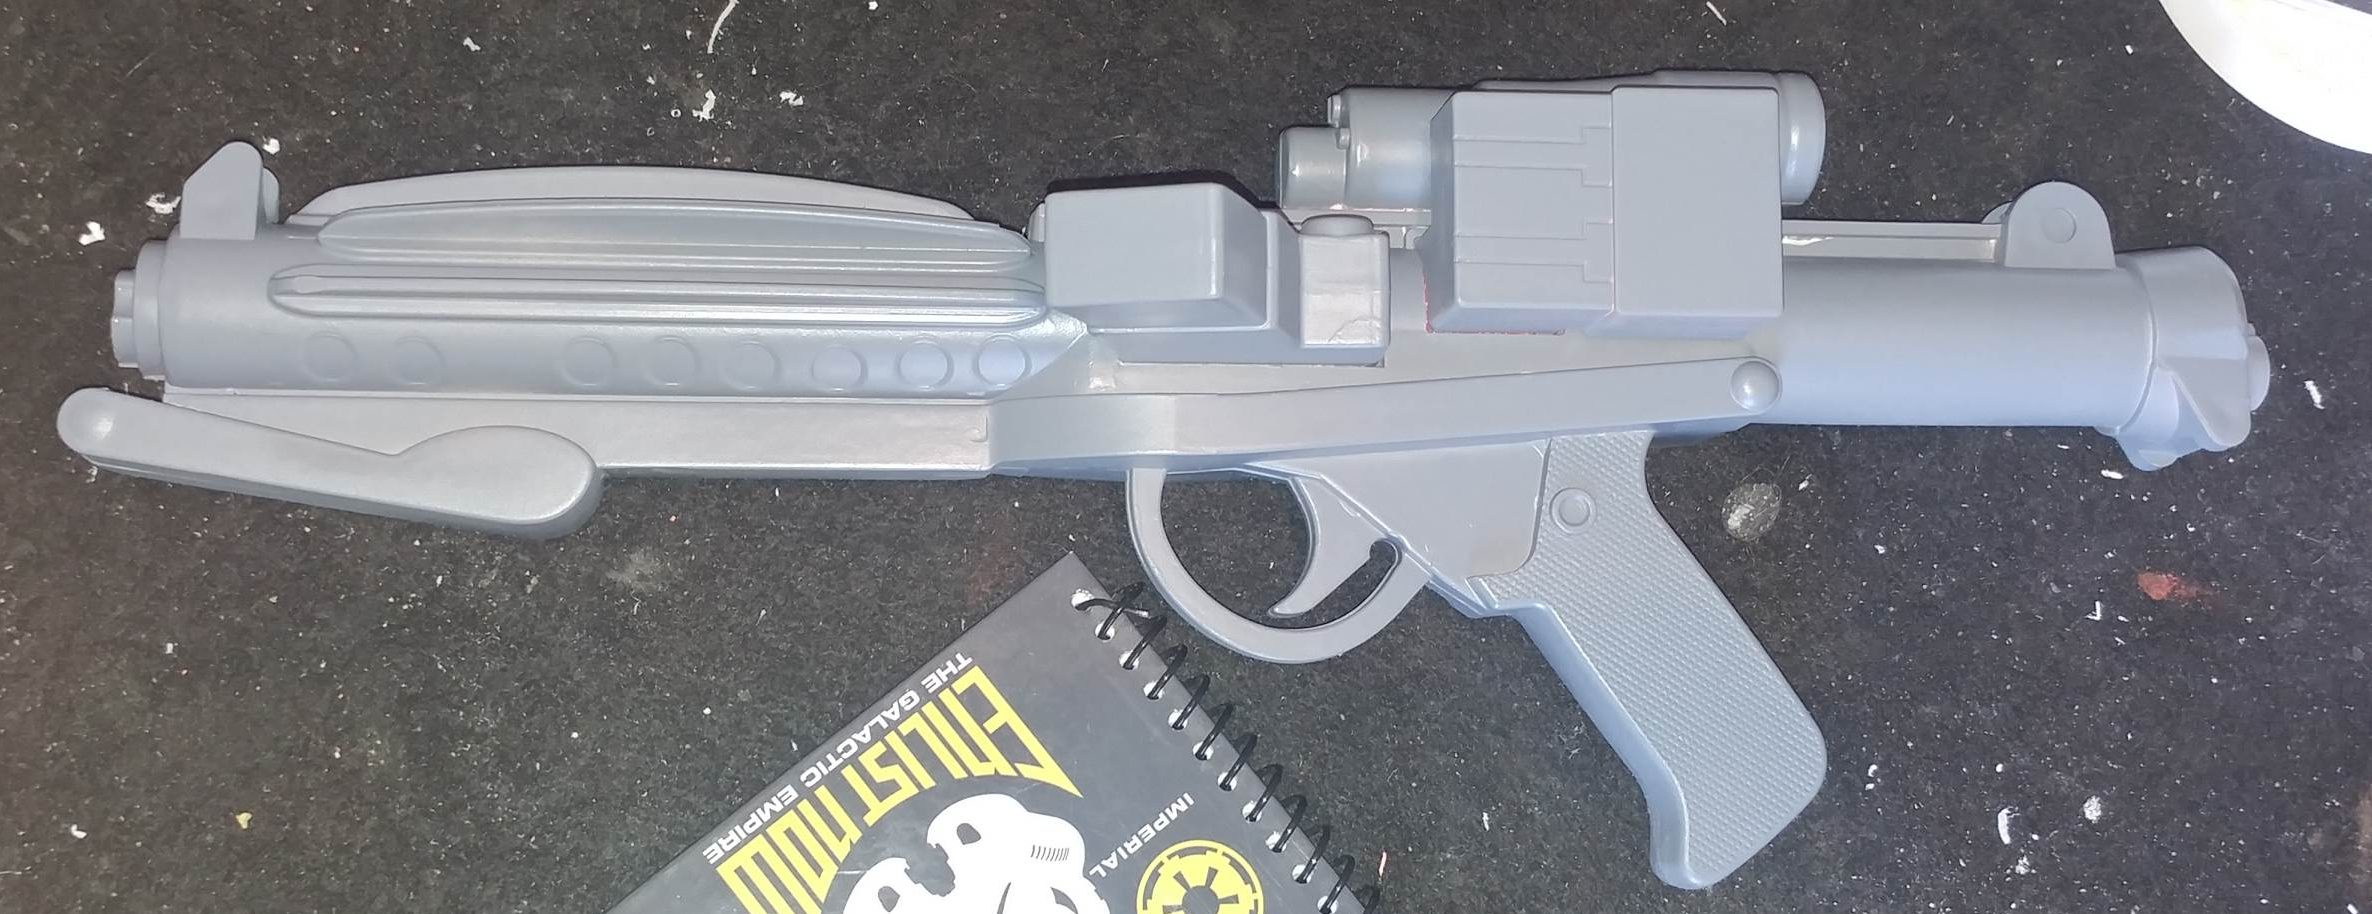
Let this dry for a a couple hours, go over any areas that need a little more sanding and repaint if necessary.
Ready for your blaster to look like a blaster? Me too. Hit the blaster with the Satin Black paint. We use Satin black because it isn’t as shiny as a gloss black and gives the blaster an almost metallic look.
This paint, in my experience comes out of the can pretty thick and as such tends to puddle up pretty quickly if you aren’t paying attention. I usually do a couple of light coats spaced out over an hour or so. The brand of paint I use tends to take quite a while to dry. I suggest painting one side and then allowing it to dry for half a day. Then paint the other side waiting about the same amount of time before handling it.
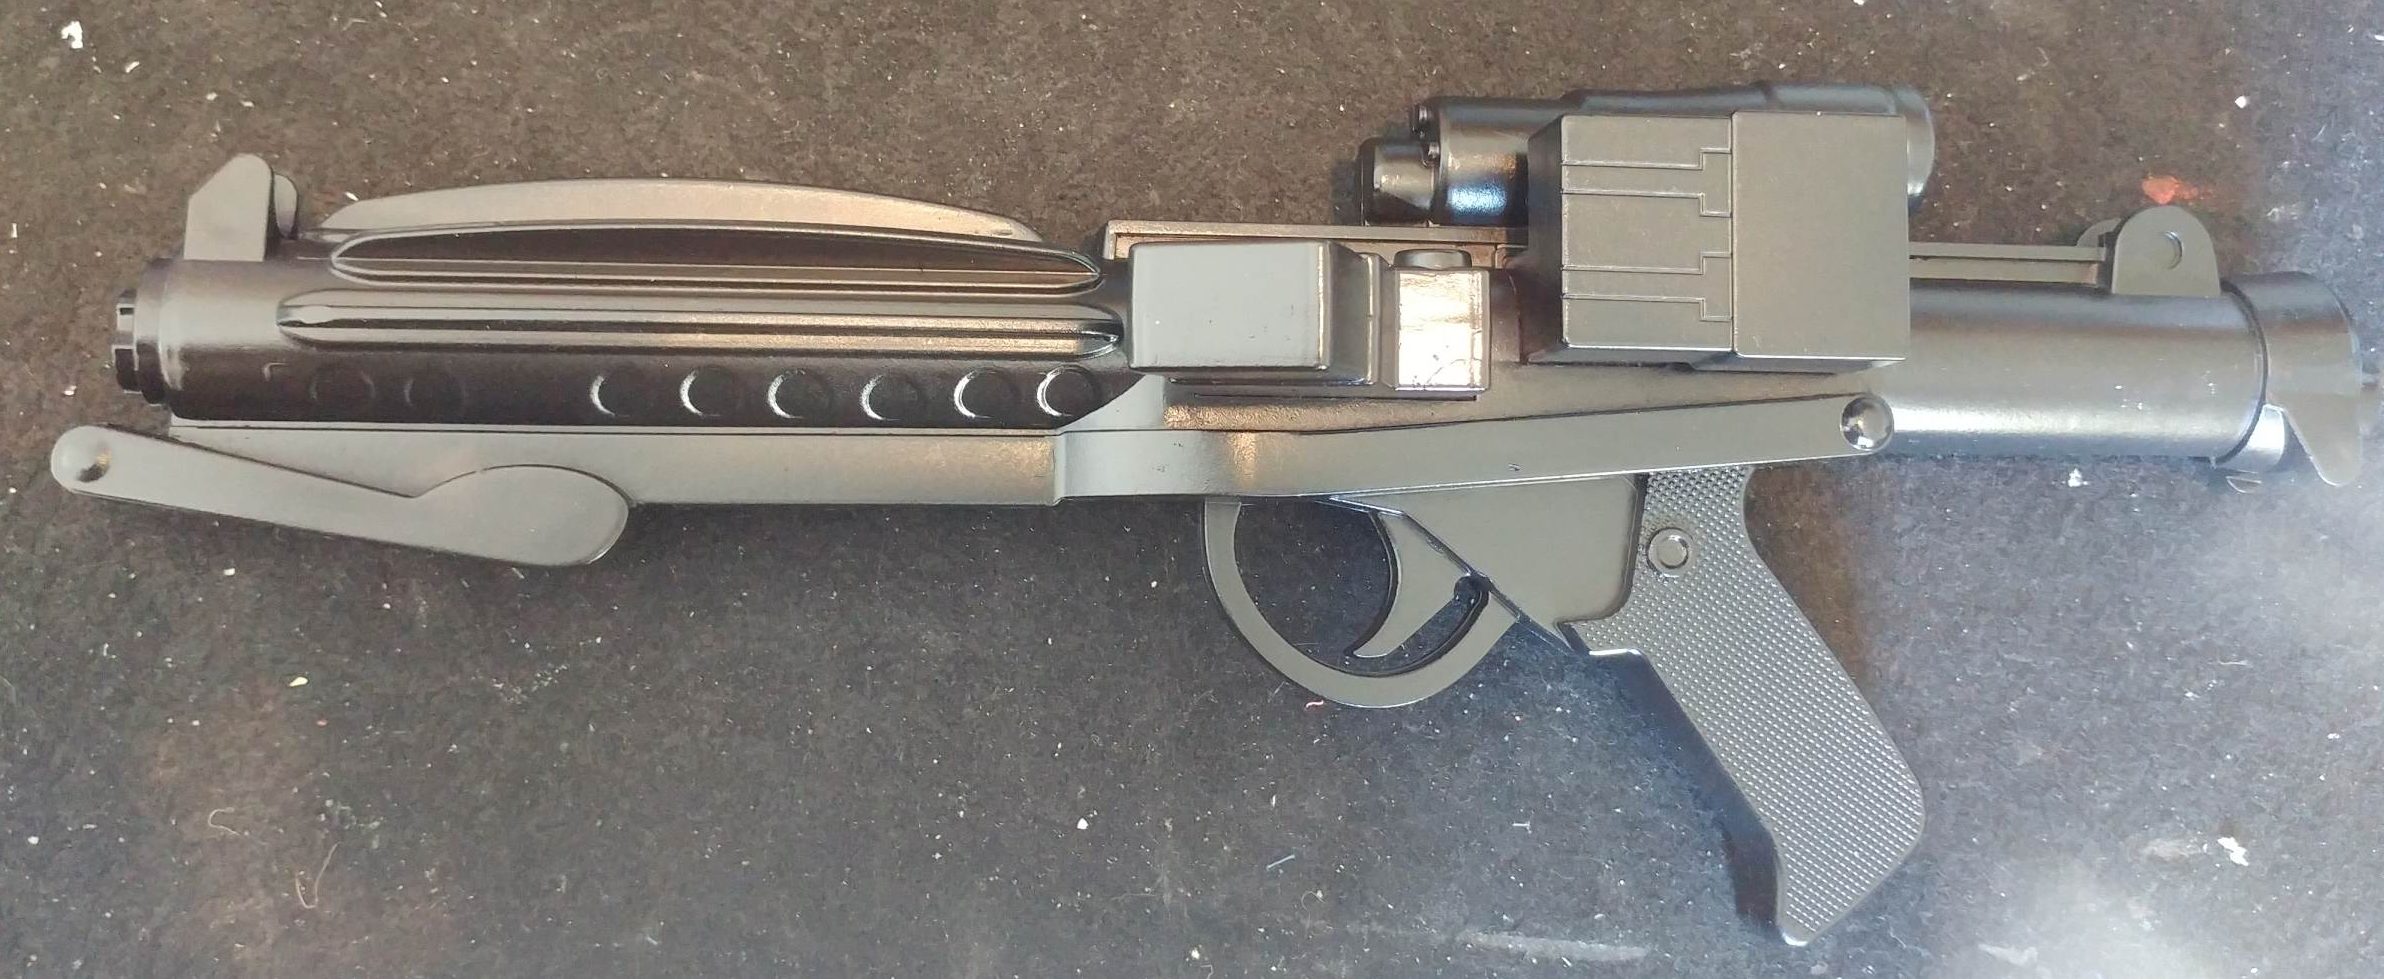
The Scope is bronze under the paint and the ‘T-Tracks’ are plastic pieces attached to the Sterling SMG to cover the vent holes on the barrel.
- Take a flat black paint and paint the the ‘T-Tracks’ on the barrel.
- Take the Bronze and dry brush the scope. Do this by dipping the brush in the paint, then wiping off most of the paint on to a paper towel or something. Take the brush and lightly brush the edges of the scope. Don’t go overboard on this. I do. All the time. Unless you want your blaster to looks like its been in every battle from Jedha to Jakku.
- Take the silver/metallic paint and do the same as above to the blaster. Ignoring the ‘T-Tracks’ and the grip (these are plastic on the real Sterling SMG the E-11 is based on).

*End of copy and pasted bits*
You will also want to paint the the ejection port, faux bolt, and the spring silver metallic.
AND THAT’S (probably) IT!
You should now have a pretty awesome blaster that looks screen accurate and is significantly cheaper than some of the licensed blasters our there.
I’m really tired. So I’m going to end this now. If you have any questions about the process or need clarification on something feel free to contact me at the email below.
Got any questions on this build? Leave a comment below or send me an email at [email protected] or hit me up on twitter @HothPod